ApacheDS is an extensible and embeddable directory server entirely written in Java, which has been certified LDAPv3 compatible by the Open Group. Besides LDAP it supports Kerberos 5 and the Change Password Protocol. It has been designed to introduce triggers, stored procedures, queues and views to the world of LDAP which has lacked these rich constructs.
Download and install ApacheDS through ApacheStudio
Lets download ApacheStudio which allow us to brows and setup LDAP users in ApacheDS. You can find downloadable instance from official web page. Then install the ApacheStudio in to your local PC.
- Windows XP, Vista or 7.
- a Java Runtime Environment 6 or later.
Lets open ApacheStudio and then Create server instance from ApacheStudio by right click on LDAP Servers section (As show in below figure) and click New->New Server.

Then give Server Name and click finish. Now we have created ApacheDS instance and then lets create our own partition.
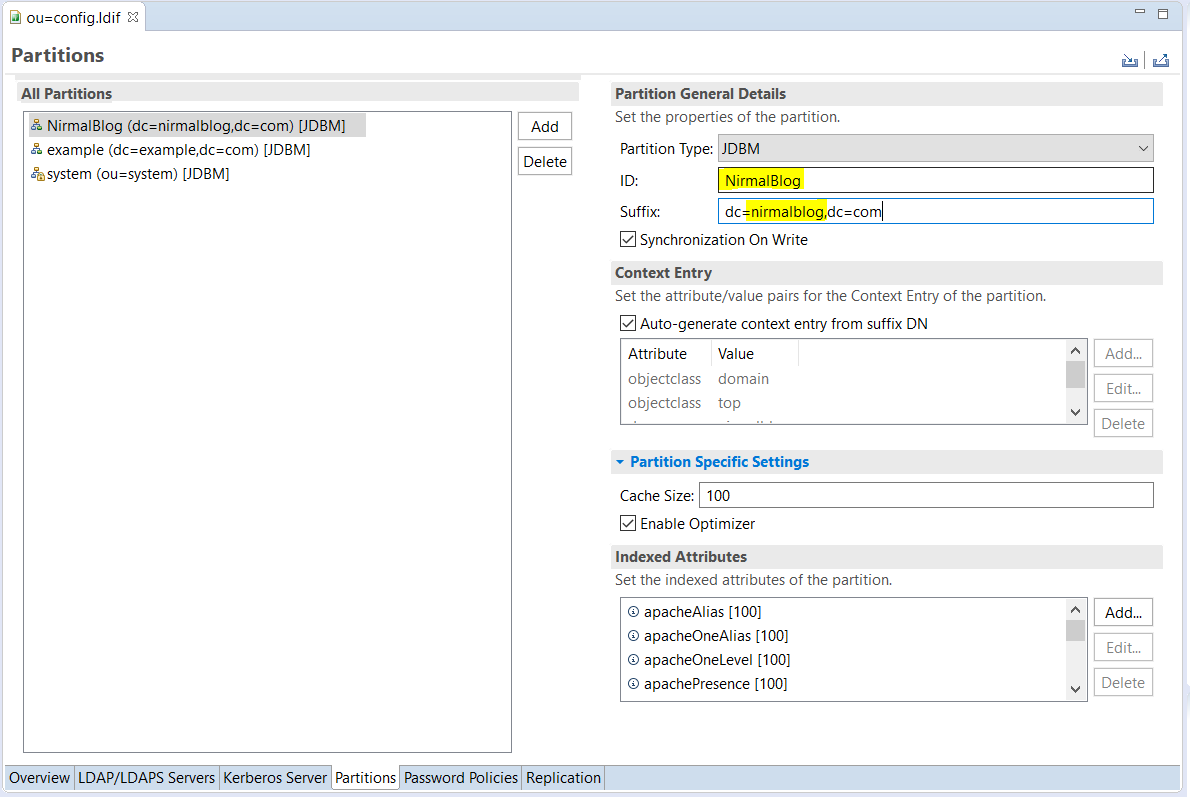
First double click on the server instance we created and click on Partitions section. Then click on Add button as show in below figure.

Then Click on ID and provide partition id in the field. I have provided ID as "NirmalBlog" then Suffix section you have to provide Domain Component (DC) in your ldap settings so I have provided it as "nirmalblog" and then save.

Then lets start the server by right click on server instance and start server.
Click on Connections section(As show in below figure) and click New Connection in order to create connection to ApacheDS instance we create.

Then give Server Name and click finish. Now we have created ApacheDS instance and then lets create our own partition.
First double click on the server instance we created and click on Partitions section. Then click on Add button as show in below figure.

Then Click on ID and provide partition id in the field. I have provided ID as "NirmalBlog" then Suffix section you have to provide Domain Component (DC) in your ldap settings so I have provided it as "nirmalblog" and then save.
Then lets start the server by right click on server instance and start server.
 |
| Run server instance |
Click on Connections section(As show in below figure) and click New Connection in order to create connection to ApacheDS instance we create.

Then provide your connection name(your proffered name), as show in below. Make sure to change the port to 10389 which is default port for ApacheDS.
Connection Name : nirmalBlogConnection
Hostname: localhost
Port:10389
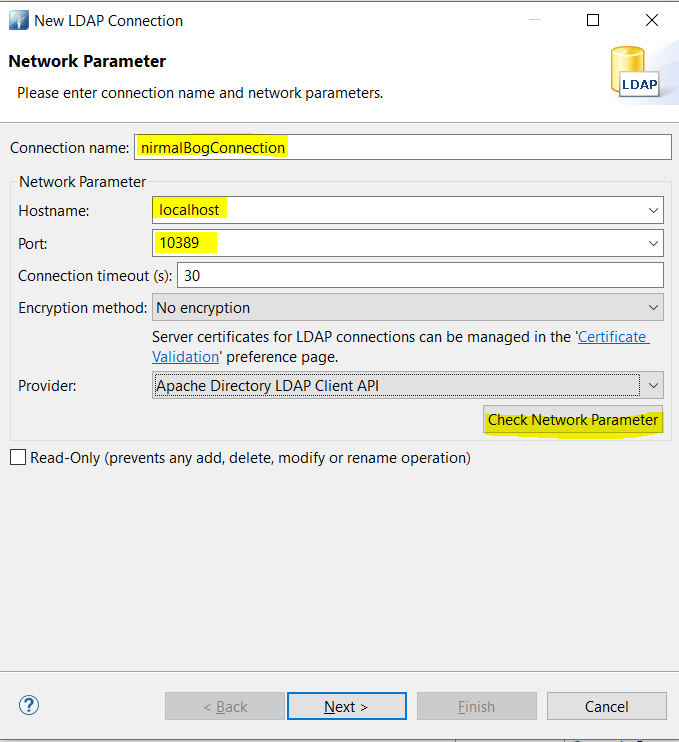
Then click next and select Authentication Type as No Authentication. Then click finish.

Then you should be able to see LDAP connection through the ApacheStudio(similar to figure below)

Lets Setup LDAP users in ApacheDS through ApacheStudio
First I will list down some of common words used in LDAP
DC - Domain Component
OC - Organization Unit
DN - Distinguished Name
CN - Common Name
SN - Name
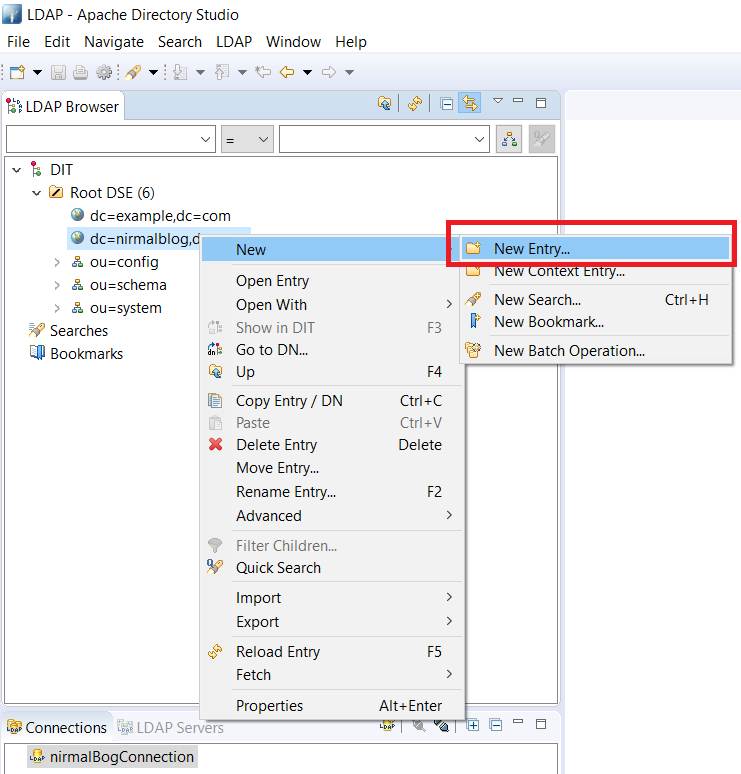
First Lets add Organization unit in our LDAP server for that right click on newly added Partition (dc=nirmalblog,dc=com) and click New->New Entry
 |
| Add new Entry |
Then select Create entry from scratch(as show in below figure) and then click next

Then type "organization"in Available object classes field and select organizationalUnit and click Add button. Then organizationalUnit added in to Selected Object Classes section and then click Next.

Then select ou and give organization unit as "users". As show in below figure.

Then click next and Then click finish. After that you should be able to see similar structure to below figure in your LDAP tree.

Then lets add new person in to this organization unit. For that right click on "users" organization unit that we have added and right click then click New->New Entity.
Then select "Create entry from scratch" and click Next.
Then type "inetOrgPerson"in Available object classes field and select inetOrgPerson and click Add button. Then inetOrgPerson added in to Selected Object Classes section and then click Next.

Then I will provide following details in to my user
cn - nirmal
sn - balasooriya
emplyeeNumber - 1
mail - nirmal@blog.com

Then click Next. On next page click on new Attribute button show in below figure.

Then type "userPassword" in Attribute type and click Finish.

Once you click Finish it will popup dialog box to enter new password for the user. Then type user password and reenter the password. Then click Ok.

After that you should able to see similar figure as below. Then Click Finish

Now new user should be added in to LDAP tree structure similar to below figure.

So we have setup our LDAP server with one user and on next Blog post I will demonstrate how to use this setup to authorization of users on Spring Boot web application .
No comments:
Post a Comment