I will use following initial setup project which you can access from following location. This is just base configurations for SpringBoot application with SQLServer integration. Make sure you have reconfigure you PC with pre requirements.
Prerequisites
- You should have install java 1.8 or above.
- You should have Eclipse installed in your PC.
- Your PC should setup Maven installed and configured.
- Your SQLServer need to have user who have access to the configured database and user should able to log in to the database by user name/password. (Make sure that TCP/IP port configured for default ports)
First of all lets add the required dependencies in to the POM file. Following five dependency needed to add in between <dependencies> tags
        <dependency>
            <groupId>org.springframework.boot</groupId>
            <artifactId>spring-boot-starter-data-jpa</artifactId>
        </dependency>
 <dependency>
     <groupId>com.microsoft.sqlserver</groupId>
     <artifactId>mssql-jdbc</artifactId>
     <version>6.1.0.jre8</version>
 </dependency>
        <dependency>
            <groupId>org.springframework.boot</groupId>
            <artifactId>spring-boot-starter-activemq</artifactId>
        </dependency>

<dependency>
            <groupId>org.apache.activemq</groupId>
            <artifactId>activemq-broker</artifactId>
        </dependency>
<dependency>
            <groupId>com.google.code.gson</groupId>
            <artifactId>gson</artifactId>
        </dependency>
Configure SpringBoot with SQLServer in JPA
First lets update the database properties in spring boot property file. you have to update following parts on the properties file.
spring.datasource.url=jdbc:sqlserver://localhost;databaseName=TestDBspring.datasource.username=nirmalspring.datasource.password=Test123_spring.datasource.driverClassName=com.microsoft.sqlserver.jdbc.SQLServerDriverspring.jpa.show-sql=truespring.jpa.database-platform=org.hibernate.dialect.SQLServer2012Dialectspring.jpa.hibernate.ddl-auto = create-drop
Then lets create JPA model for our table. Note that in this example I'm using same model for the JSON structure as well.
I will create Table in following structure.
package com.blogspot.nirmal.springboot;
import net.minidev.json.annotate.JsonIgnore;
import javax.persistence.*;
@Entity@Table(name="RECEIVING_MSG")
public class ReceivingMsg {

    @Id    @GeneratedValue(strategy=GenerationType.AUTO)
    @JsonIgnore    private long id;    @Column(name = "NAME")
    private String name;    @Column(name = "EMAIL")
    private String email;    @Column(name = "AGE")
    private int age;    @Column(name = "IS_DEV")
    private boolean isDeveloper;

    public long getId() {
        return id;    }

    public void setId(long id) {
        this.id = id;    }

    public String getName() {
        return name;    }

    public void setName(String name) {
        this.name = name;    }

    public String getEmail() {
        return email;    }

    public void setEmail(String email) {
        this.email = email;    }

    public int getAge() {
        return age;    }

    public void setAge(int age) {
        this.age = age;    }

    public boolean isDeveloper() {
        return isDeveloper;    }

    public void setDeveloper(boolean developer) {
        isDeveloper = developer;    }

    @Override    public String toString() {
        return "ReceivingMsg{" +
                "name='" + name + '\'' +
                ", email='" + email + '\'' +
                ", age=" + age +
                ", isDeveloper=" + isDeveloper +
                '}';    }
}
Here I will use auto generated ID as primary key of the table and it will be ignored in JSON structure.
Then I'll create basic DAO for this model.
package com.blogspot.nirmal.springboot.dao;
import com.blogspot.nirmal.springboot.ReceivingMsg;import org.springframework.data.jpa.repository.JpaRepository;import org.springframework.stereotype.Repository;
@Repositorypublic interface IReceivingMsgDao extends JpaRepository<ReceivingMsg, Long> {
    ReceivingMsg findByName(String name);
}
Here I have added interface method wich automatically mapped to retrieve Messages from name.
Configure SpringBoot with ActiveMQ
First of all lets add the configuration details as bellow. Update the ActiveMQ details section on the properties file.
Lets Add ActiveMQ Listener
We can add the listener class in to our application in following manner.
package com.blogspot.nirmal.springboot;
import com.blogspot.nirmal.springboot.dao.IReceivingMsgDao;
import com.google.gson.Gson;
import org.springframework.beans.factory.annotation.Autowired;
import org.springframework.jms.annotation.*;
import org.springframework.messaging.handler.annotation.*;
import org.springframework.stereotype.Component;
import javax.jms.*;import java.util.Map;
@Componentpublic class AmqListener {

    @Autowired    IReceivingMsgDao iReceivingMsgDao;
    @JmsListener(destination = "inbound.queue")
    public void receiveMessage(final Message jsonMessage) throws JMSException {
        String messageData = null;
System.out.println("Received message " + jsonMessage);
String response = null;
     if(jsonMessage instanceof TextMessage) {
        TextMessage textMessage = (TextMessage)jsonMessage;
messageData = textMessage.getText();
ReceivingMsg msg = new Gson().fromJson(messageData, ReceivingMsg.class);
System.out.println(msg);
        iReceivingMsgDao.save(msg);        }
    }
}
Here is the most of important annotation used in the class related to ActiceMQ
@JmsListener(destination = "inbound.queue") : This will make our listener method to listen to provided queue in destination parameter.
Other than that we used @Autowired annotation to inject our Dao and used it to save the message receiving on Active MQ.
Lets Update Application main class
Then at last lets update our Application main class as follows. In There we used @EnableJms will make enable the Java Message Services in our application.
Lets run our application
In order to demonstrate this we need to have ActiveMQ server run in our local PC. First lets download it from official web page in following location. Then extract it in to your local PC and then go to apache-activemq-5.15.11\bin\win64 location from extraction parent directory. Then run the activemq.bat to start our ActiveMQ server.

Then you can go to http://localhost:8161/admin/queues.jsp URL and see your available Queues in PC. Since we have note created any you suppose to see similar page as bellow.

and after it successfully started you can update above page and could see the newly created ActiveMQ queue "inbound.queue" as show in bellow.

Then lets run our application as on Maven using following command
mvn spring-boot:run
Then lets send some sample message in to our queue in order to test whether our application reading that message from queue and saving the message details in to the database. click on the "Send To" link as show in Blue circle. Then you can see interface similar to following.

As show in above screen past following JSON structure in message body and clieck on send button.
{
"name":"AZX",
"email":"sample.yahoo.com",
"age":"12",
"isDeveloper":"true"
}
Then in the loading page you could see similar to following screen. In There you could see number of messages in Message Enqueued and Message Dequeued. Since we just only send once you could only see one there if you send more messages it will increased.

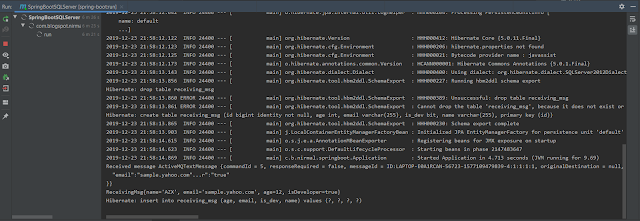
Then lets see whether our application read that queue and save that message in to the database. Following figure shows the logs related to that message and at the end you could see it mentioning inserting record in to table.
Then lets verify it from Database by querying the table

As you can see it has successfully saved in to the database.
We have successully implemented our application and full source code can be access on following GITHub location.
@JmsListener(destination = "inbound.queue") : This will make our listener method to listen to provided queue in destination parameter.
Other than that we used @Autowired annotation to inject our Dao and used it to save the message receiving on Active MQ.
Lets Update Application main class
Then at last lets update our Application main class as follows. In There we used @EnableJms will make enable the Java Message Services in our application.
package com.blogspot.nirmal.springboot;
import javax.sql.DataSource;
import org.springframework.boot.SpringApplication;import org.springframework.boot.autoconfigure.SpringBootApplication;import org.springframework.boot.builder.SpringApplicationBuilder;import org.springframework.context.annotation.ComponentScan;import org.springframework.data.jpa.repository.config.EnableJpaRepositories;import org.springframework.jms.annotation.EnableJms;
@ComponentScan({ "com.blogspot.nirmal.springboot" })
@EnableJpaRepositories("com.blogspot.nirmal.springboot.dao")
@SpringBootApplication(scanBasePackages = { "com.blogspot.nirmal.springboot" })
@EnableJms
public class Application {
   public static void main(String[] args) {
      SpringApplication.run(Application.class, args);   }
}
Lets run our application
In order to demonstrate this we need to have ActiveMQ server run in our local PC. First lets download it from official web page in following location. Then extract it in to your local PC and then go to apache-activemq-5.15.11\bin\win64 location from extraction parent directory. Then run the activemq.bat to start our ActiveMQ server.

Then you can go to http://localhost:8161/admin/queues.jsp URL and see your available Queues in PC. Since we have note created any you suppose to see similar page as bellow.

and after it successfully started you can update above page and could see the newly created ActiveMQ queue "inbound.queue" as show in bellow.

Then lets run our application as on Maven using following command
mvn spring-boot:run
Then lets send some sample message in to our queue in order to test whether our application reading that message from queue and saving the message details in to the database. click on the "Send To" link as show in Blue circle. Then you can see interface similar to following.

As show in above screen past following JSON structure in message body and clieck on send button.
{
"name":"AZX",
"email":"sample.yahoo.com",
"age":"12",
"isDeveloper":"true"
}
Then in the loading page you could see similar to following screen. In There you could see number of messages in Message Enqueued and Message Dequeued. Since we just only send once you could only see one there if you send more messages it will increased.

Then lets see whether our application read that queue and save that message in to the database. Following figure shows the logs related to that message and at the end you could see it mentioning inserting record in to table.

Then lets verify it from Database by querying the table

As you can see it has successfully saved in to the database.
We have successully implemented our application and full source code can be access on following GITHub location.


