Tuesday, June 30, 2015

Enable click event on disabled html element

This post will explain steps to trigger click event on disable html elements. Generally disable HTML elements will not fire any javascripts events but some times we needs to disable HTML elements initially and then in click event we may need to enable element. That kind of scenarios we can use following steps to archive it.

Whole example will be available in JSFiddle and you can try it your self. 
For this example I will use simple button to change a select field enable/disable function. Initially select field will be disabled and on the click event it will get enable. But actually user click on a another div placed in front of the select field but user will not have any idea about that. This div will be enable only when select field is disable.

<button id="enbDesBtn">Enable Passengers</button>
<div id="wrapper">
    <select id="passengers" disabled>
        <option value="1">Lakshan</option>
        <option value="2">Udara</option>
        <option value="3">Devmini</option>
        <option value="4">Nimasha</option>
    </select>
    <div id="overlay"></div>
</div>

Figure 1: HTML file view

Then we have to add following CSS and JavaScript in to HTML to archive our target. 

Javascript

var button = document.getElementById('enbDesBtn'),
    cars = document.getElementById('passengers'),
    overlay = document.getElementById('overlay');

button.addEventListener('click', function () {
    cars.disabled = !cars.disabled;
    var value="";
    if (cars.disabled) {
        button.textContent = 'Enable';
        value = 'Disable';
    } else {
        button.textContent = 'Disable';
        value = 'Enable';
    }
    alert(value);
}, true);

cars.addEventListener('change', function (evt) {
    console.log(evt.target.value);
}, true);

overlay.addEventListener('click', function () {
    alert('Disabled');
}, true);


CSS

#wrapper {
    display:inline-block;
    position:relative;
}
#overlay {
    display:none;
    width:100%;
    height:100%;
    position:absolute;
    top:0
    left:0;
    bottom:0;
    right:0;
}
#passengers:disabled + #overlay {
    display:block;
}

After adding above CSS and Javascripts in to HTML whole file will be similar to following.

<html>
<head>
<script>
window.onload=function(){
var button = document.getElementById('enbDesBtn'),
    cars = document.getElementById('passengers'),
    overlay = document.getElementById('overlay');

button.addEventListener('click', function () {
    cars.disabled = !cars.disabled;
    var value="";
    if (cars.disabled) {
        button.textContent = 'Enable';
        value = 'Disable';
    } else {
        button.textContent = 'Disable';
        value = 'Enable';
    }
    alert(value);
}, true);

cars.addEventListener('change', function (evt) {
    console.log(evt.target.value);
}, true);

overlay.addEventListener('click', function () {
    alert('Disabled');
}, true);
}
</script>
<style>
#wrapper {
    display:inline-block;
    position:relative;
}
#overlay {
    display:none;
    width:100%;
    height:100%;
    position:absolute;
    top:0
    left:0;
    bottom:0;
    right:0;
}
#passengers:disabled + #overlay {
    display:block;
}
</style>
</head>
<body>
<button id="enbDesBtn">Enable Passengers</button>
<div id="wrapper">
    <select id="passengers" disabled>
        <option value="1">Lakshan</option>
        <option value="2">Udara</option>
        <option value="3">Devmini</option>
        <option value="4">Nimasha</option>
    </select>
    <div id="overlay"></div>
</div>
</body>
</html>

As above example shows this functionality can be integrate with any other kind of HTML elements such as input fields, radio buttons etc.

Saturday, June 20, 2015

Create a war file using eclipse maven plugin

In this post I will explain how to set up eclipse to create war file from dynamic web project. Later it can be use to deploy web application on tomcat.

Prerequisites 
  1. You should have install java in your PC and set path variable correctly (JAVA_HOME, JRE_HOME)
  2. You should have Apache Tomcat in your machine.
  3. You should have install Eclips Java EE LUNA IDE in your PC.

Step 1 First create Dynamic web project 

As a first step we needs to have web project to create war file from it. So to create dynemic web project Go to New->Other and select dynamic web project then provide project name and select run time environment. In this post I'm using project name as SampleMavenProject and my run time environment as tomcat 7.

Then add new index.jsp file to webcontent directory in your project structure and add following content in to that.


<html>
    <head>
        <title>Index File Maven Project</title>
    </head>
    <body>
        <b>Maven test project running</b>
    </body>
</html>

Then we have to convert the Dynamic Web Project in to Maven Project to do that right click on project and go to Configure->Convert to Maven Project. (Figure 1)

Figure 1: Convert to Maven project

Then next interface you can provide details regarding the war file that you are going to create such as war file name and version etc and then click Finish. (Figure 2)

Figure 2: Provide details about project

After you click Finish you can see new pom.xml file is created on your project and in pom.xml you can see automatically added maven plugin details in to plugin section. (Figure 3)

Figure 3: New pom.xml created in project structure 

Then lets create war file from the project. Click right click on Run As->Maven Build and enter clean install in Goals and click run. (Figure 4)

Figure 4: Add clean install in Goals section

Then you can see similar out put in console in that you can see Build success notification and the war file generated location.(Figure 5)

Figure 5: Console out put

We have successfully created war file from our project. If you need to deploy it to Apache Tomcat then go to the war file generated location and copy that war and past it in webapps 
Apache Tomcat directory.
Then start the Apache Tomcat server and you can see your project folder will extracted in webapps folder. Then you can access you project on relevant project link. 


Setup Jenkins in Windows

In this post I'm going to explain step by step process to setup Jenkins in local machine.

Prerequisites 
  1. You should have install java in your PC and set path variable correctly (JAVA_HOME, JRE_HOME)
  2. You should have Apache Tomcat in your machine.
  3. You should have install Eclips Java EE LUNA IDE in your PC.

Step 1 Download Jenkins and setup

First we have to download Jenkins from Jenkins home page. You can download the Jenkins.war file in download Jenkins section. In this post I'm using version 1.617 Jenkins.

Figure 1: Download war file from Jenkins home page.
Then put Jenkins.war in to webapps folder in Apache Tomcat installation directory. (As show in Figure 2). Then start the  Apache Tomcat using startup.bat.

Figure 2: Place Jenkins.war in weapps folder on Apache Tomcat directory.

After successfully Tomcat started you can type http://localhost:8888/jenkins/ and access the Jenkins in your local machine. (Here 8888 is the port that use as http-apr)

Figure 3: Jenkins run in Tomcat

Saturday, June 13, 2015

Setup SVN server in local machine

As a developer it's really need to have understand on version controlling when work with project which contributed more developers development knowledge. In this post I will explain how to set up visual SVN server (https://www.visualsvn.com/) on local machine. 

Prerequisites 
  1. You should have install java in your PC and set path variable correctly (JAVA_HOME, JRE_HOME)
  2. You should have install Eclipse Java EE IDE in your PC

Step 1 Download and install virtual SVN server

First we have to download the visual SVN server (Version 3.3.1) from following location https://www.visualsvn.com/server/download/ select the correct bit version (Figure 1) and download the software.

Figure 1: Download appropriate version
Double click the downloaded file and install the server in to local machine. You can see interface similar to Figure 2.

Figure 2: Welcome screen of visual SVN server setup
Then click next, accept the terms and conditions then click next then you can see interface similar to Figure 3. Select visual SVN server and management console and make sure to check Add subversion command line tool to PATH environment variable then click next.

Figure 3: Select visualSVN server and management console

Then click on Standard edition (Figure 4)

Figure 4: Select standers edition
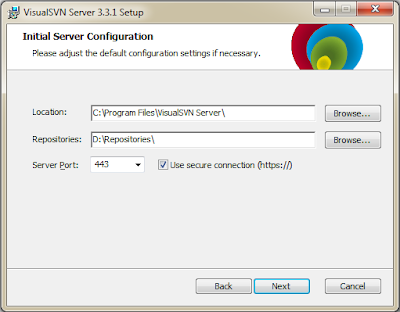
In next interface you have to provide installation directory for visualSVN server , the repository folder location and port to run visualSVN server. Figure 5

Figure 5: Provide basic details to install visualSVN
Then click next and from the next interface click on install button. After completion of installation you can see similar interface to Figure 6. Then Click finish.

Figure 6: Installation complete screen

Step 2 Configure visual SVN server

First run visualSVN program that you have installed in previous step. Then Right click on Repository and click on Create New Repository as show in Figure 7.

Figure 7: Select Create New Repository
On the pop up interface provide valid name for the repository you are going to create. (Figure 8) Then click new and on next interface select Single project repository and click Next.(Figure 9)

Figure 8: Provide valid name for repository

Figure 9: Select Singer Project Repository
On next interface select All subversion users have Read/Write access(Figure 10)then click on create.

Figure 10: Select All subversion user have Read/Write access option and click create
After successful installation you can see interface similar to Figure 11. In that interface you can see the repository URL witch use to access the repository.

Figure 11: Successfully created repository
Then click finish and now you can see your newly created repository under Repositories on visualSVN server. Then go in to your repository and expand it. Then right click on Trunk then select New->Folder and provide a folder name for a project that you going to setup in your repository. 

Figure 12: Click on New-> Folder
Then lets create new user for newly created repository for that right click on Users and Click create user. On the interface provide user name and password. (Figure 13)

Figure 13: Create user by providing user name and password

Step 3 Comit project into newly created SVN repository

Lets add new project in to newly created SVN repository. First lets create sample project on Eclipse (Any kind of project). Then we have to add SVN repository path in to Eclipse. Go to Window->Open perspective->Other 

Figure 14: Select other on Open perspective 
Select SVN repository Exploring and select Ok. Figure 15

Figure 15: Select SVN repository Exploring
Then right click on repository perspective and select New->Repository Location Then you can see similar interface to Figure 16. In that provide the repository URL that we have crated in second step.(https://Nadeesha-PC/svn/it.con.testSVN/) Then provide user credentials that you have created on creating user on visualSVN server then click finish

Figure 16: Provide repository details and Finish
Now we have added the repository URL in to eclipse and now we can add projects in to that repository. Now right click on the project that we created in previous step and select Team->Share Project then select the select SVN and select next. On next interface select existing repository location and click Finish. Now we have successfully added a project in to our repository. 

In project perspective you can see SVN path at the end of project name as show in figure 17. 

Figure 17: Successfully added a project
In visualSVN server also show the newly added project in to repository as show in Figure 18.

Figure 18: Newly added project in visualSVN server
We have successfully added a project in to visualSVN server. :)

Friday, June 12, 2015

Log4J2 logging on JSP (In tomcat 7)

In this post I will explain steps to enable log4J2 logging on JSP files in web project. From the same way you can add this logs in to Java classes as well. It's highly recommend not to use logs on jsp unnecessary because it may lead to performance issue on your web application.

Prerequisites 
  1. You should have install java in your PC and set path variable correctly (JAVA_HOME, JRE_HOME)
  2. You should have install Eclips Java EE IDE in your PC
  3. You should have Apache Tomcat in your machine and it should be added to Run Time Environments in Eclips

Step 1 Create Dynamic web project
To Create dynamic web project go to File->New->Dynamic Web Project and give preferred name for the project and click finish. Then add a index.jsp file in to web content folder and add following content in to that file.

Content to index.jsp file

<html>
    <head>
        <title>Demonstration log4j usage in jsp</title>
    </head>
    <body>
        <b>The log messages are shown save in the ${catalina.home}/logs/app.log file.</b>
    </body>
</html>

Then right click on project and give run on server then you can see similar screen to Figure 1.

Figure 1 : When projects run on server content in index.jsp will be shown similar to this screenshot 

 Step 2 Add log4J2 libraries and configurations 
Then go to the following page https://logging.apache.org/log4j/2.0/download.html and download apache-log4j-2.3-bin.zip. Then extract the content in to folder.

Then right click on WEB-INF folder inside the WebContent folder add log4J2.xml with following configurations.

log4J2.xml file content

<?xml version="1.0" encoding="UTF-8"?>
<configuration status="WARN">
  <appenders>
    <Console name="Console" target="SYSTEM_OUT">
      <PatternLayout pattern="%d{HH:mm:ss.SSS} [%t] %-5level %logger{36} - %msg%n"/>
    </Console>

    <File name="MyFile" fileName="${sys:catalina.home}/logs/app.log">
        <PatternLayout pattern="%d{yyyy-mm-dd HH:mm:ss.SSS} [%t] %-5level %logger{36} - %msg%n"/>
    </File>             
  </appenders>

  <loggers>     
<root level="debug">
       <appender-ref ref="MyFile" level="error"/>
       <appender-ref ref="MyFile" level="fatal"/>
       <appender-ref ref="MyFile" level="warn"/>            
    </root>    
  </loggers>
</configuration>

Then we have to add "log4j-api-2.3.jar" , "log4j-core-2.3.jar" files from downloaded jar files in to lib folder as show in Figure 2.Then right click on the project and Build Path -> Configure Build Path and add two Jar files in to libraries. (Click on add jar and select the two jars in lib folder)

Figure 2 : Two jar files in lib folder inside WEB-INF

Figure 3: Add two jar files in to libraries

Then click on Source tab in same interface and add WEB-INF folder in to build path. You can add folder by click on Add folder and select the WEB-INF folder.

Figure 4 : Add WEB-INF in to build path
Now lets add some logs in to index.jsp page in Web content folder. Replace index.jsp file with following content.

<%@ page import="org.apache.logging.log4j.Logger" %>
<%@ page import="org.apache.logging.log4j.LogManager" %>
<html>
    <head>
        <title>Demonstration log4j usage in jsp</title>
    </head>
    <body>
        <% Logger log = LogManager.getLogger(this.getClass());
           log.info("Show INFO message");
           log.warn("Show WARN message");
           log.error("Show ERROR message");
           log.fatal("Show FATAL message"); %>
        <b>The log messages are shown save in the ${catalina.home}/logs/app.log file.</b>
    </body>
</html>

Step 3 Do necessary changers on Tomcat 7

Here we just need to add "log4j-api-2.3.jar" , "log4j-core-2.3.jar" files in to tomcat lib folder.(As show in Figure 5)

Figure 5: Add jars in to Tomcat lib folder

Now we have completed all the configurations so now lets run the project by right click on project and go to Run As->Run On Server. You will see screen similar to Figure 6 and if you go to Tomcat installation directory -> logs folder then you can see app.log file with similar content to Figure 7

Figure 6: Interface when run the project on Eclips
Figure 7: Logs are written in to app.log file

These are the basic steps to add log4j2 in to web application and put logs in JSP but it's highly recommend to not to add logs in to JSP files since those are loaded in to client side if there are lots of logs in jsp's then there might be performance issue arises. It's better to use logs only if necessary to use in jsps.

Sunday, June 7, 2015

Track web site visitors using Google Analytic Free

In this post I'm going to explain integrating Google Analytic in to web site and way of tracking visitors to the particular web page. This is using Eclips but if you get the basic concept behind this you can integrate this with any web project.

Prerequisites 
  1. You should have install java in your PC and set path variable correctly (JAVA_HOME, JRE_HOME)
  2. You should have install Eclips Java EE IDE in your PC
  3. You should have Apache Tomcat in your machine and it should be added to Run Time Environments in Eclips 
Step 1 Create Dynamic web project
As first step lets create simple Dynamic Web Project using Eclips. Go to File->New->New Dynamic Web Project. Give prefered name to the project (Here I will user project name as GoogleAnalyticTracking as Figure 1) Then click finish. 

Figure 1: New Dynamic Web Project
 Then Right click on WebContent folder and New->HTML File and give file name as index.html. Then Click finish. Then add following content in to that file.

<!DOCTYPE html PUBLIC "-//W3C//DTD HTML 4.01 Transitional//EN" "http://www.w3.org/TR/html4/loose.dtd">
<html>
<head>
<meta http-equiv="Content-Type" content="text/html; charset=ISO-8859-1">
<title>Google Analytic Tracking</title>
</head>
<body>
This is Google Analytic Tracking tutorial
</body>
</html>

Then Right click on project and select Run As-> Run On Server. If you successfully follow the steps then you can see out put like figure 2.

Figure 2: When project Run On Server 

So the page that we create have following URL

http://localhost:8080/GoogleAnalyticsTracking/

Then replace the localhost with your machine IP address. 

http://192.168.1.6:8080/GoogleAnalyticsTracking/

Now we have our simple web page and lets setup Google Analytic for this site.

Step 2 Setup Google Analytic for our web site.

Go to https://www.google.com/analytics/ site and click "Access Google Analytics" button on Right top corner. Then Click Sign Up button. Then you can see page like Figure 3.

Figure 3: Google Analytic Sign Up page
  
Provide preferred name for Account Name and Web site name.  For the web site URL provide the URL which you can access your web page. For me it would be http://192.168.1.6:8080/GoogleAnalyticsTracking/. The select reporting time zone you preferred.Then Click Get Tracking ID. 

Figure 4: Google Analytic Admin page
Then you can see there is a javascript given in text field under Web site Tracking as show in Figure 5.
Figure 5: Google tracking code
Copy and past that script in to header section in index.html as show in Figure 6.
Figure 6: Add Google Analytic Tracking code in to index.html

Now we have integrate the Google Analytic with our web page and if you have many pages to track add this script in to every page you wan't to track. To verify all the tracking working correctly go to Reporting tab click Locations under Real-Time. Then in new tab go to your page created and then go to Google Tracking Reporting you can see the access location as show in Figure 7. 

Figure 7: Real Time location data display on Google Analytic

Not only the location but also Traffic Source, Device type, Browsers and many more data can be access through this report. I'll provide further details on Google Analytic Reports in future posts. Hope this basic steps to integrate Google Analytic will help you to integrate it to any web project.