In this post I'm going to setup Spring Batch project with Spring Boot and this will use mysql data base with Spring Data as persistence API.
In this demonstration I will read CSV file and save the data in that file in to Database using Spring Batch.
Prerequisites
- You should have install java 1.8 or above.
- You should have Eclipse installed in your PC.
- Your PC should setup Maven installed and configured.
Lest Create the project
First of all open Eclipse IDE and go to File - > New -> Maven Project. Click on create simple project and press next. Then provide your project details. In my example im giving group Id as "com.nirmal.springbatch" and artifact Id as "SpringBatch". Then click finish.
First of all make sure to change run time JRE in to JDK. You can do it by right click on the project and go to Build path -> Configure Build path... then go to libraries and select JDK instead of JRE.
First of all lets add the dependencies in to POM file. Since Spring Boot remove complexity of project setup we just need to add Spring Boot references dependencies in to pom and do the required configurations based on application.properties file.
Then lets add required configurations based on application.properties file. Right click on src/main/resources add go to New -> Other select file and provide file name as "application.properties".
First of all open Eclipse IDE and go to File - > New -> Maven Project. Click on create simple project and press next. Then provide your project details. In my example im giving group Id as "com.nirmal.springbatch" and artifact Id as "SpringBatch". Then click finish.
First of all make sure to change run time JRE in to JDK. You can do it by right click on the project and go to Build path -> Configure Build path... then go to libraries and select JDK instead of JRE.
Spring Boot configurations
First of all lets add the dependencies in to POM file. Since Spring Boot remove complexity of project setup we just need to add Spring Boot references dependencies in to pom and do the required configurations based on application.properties file.
<project xmlns="http://maven.apache.org/POM/4.0.0"
xmlns:xsi="http://www.w3.org/2001/XMLSchema-instance"
xsi:schemaLocation="http://maven.apache.org/POM/4.0.0 http://maven.apache.org/xsd/maven-4.0.0.xsd">
<modelVersion>4.0.0</modelVersion>
<groupId>com.nirmal.springbatch</groupId>
<artifactId>SpringBatch</artifactId>
<version>0.0.1-SNAPSHOT</version>
<parent>
<groupId>org.springframework.boot</groupId>
<artifactId>spring-boot-starter-parent</artifactId>
<version>1.3.2.RELEASE</version>
</parent>
<dependencies>
<dependency>
<groupId>org.springframework.boot</groupId>
<artifactId>spring-boot-starter-batch</artifactId>
</dependency>
<dependency>
<groupId>org.springframework.boot</groupId>
<artifactId>spring-boot-starter-web</artifactId>
</dependency>
<dependency>
<groupId>org.springframework.boot</groupId>
<artifactId>spring-boot-starter-data-jpa</artifactId>
</dependency>
<dependency>
<groupId>javax.servlet</groupId>
<artifactId>jstl</artifactId>
</dependency>
<dependency>
<groupId>mysql</groupId>
<artifactId>mysql-connector-java</artifactId>
<version>5.1.6</version>
</dependency>
<dependency>
<groupId>com.h2database</groupId>
<artifactId>h2</artifactId>
<scope>runtime</scope>
</dependency>
</dependencies>
<build>
<plugins>
<plugin>
<groupId>org.springframework.boot</groupId>
<artifactId>spring-boot-maven-plugin</artifactId>
</plugin>
</plugins>
</build>
</project>
Then lets add required configurations based on application.properties file. Right click on src/main/resources add go to New -> Other select file and provide file name as "application.properties".
#==== connect to mysql ======#
spring.jpa.hibernate.ddl-auto=update
spring.datasource.url=jdbc:mysql://localhost:3306/sample?useSSL=false
spring.datasource.username=root
spring.datasource.password=
spring.datasource.driver-class-name=com.mysql.jdbc.Driver
spring.jpa.properties.hibernate.dialect = org.hibernate.dialect.MySQL5Dialect
spring.jpa.properties.hibernate.show_sql=false
spring.jpa.properties.hibernate.use_sql_comments=false
spring.jpa.properties.hibernate.format_sql=true
#==== Logging configurations ======#
logging.level.root=WARN,INFO,ERROR
logging.level.com.baeldung=TRACE
Then lets add our Spring Boot initializer class in to the project. Right click on project and go to New -> Class and provide class name as "AppInitializer" and package I would give as "com.nirmal.springbatch".
Then lets create model class for this Book. Right click on project and add new class with name as "Book" and package as "com.nirmal.springbatch.model".
package com.nirmal.springbatch.model;
import javax.persistence.Column;
import javax.persistence.Entity;
import javax.persistence.GeneratedValue;
import javax.persistence.GenerationType;
import javax.persistence.Id;
import javax.persistence.Table;
/**
*
* Model class for map the BOOK table using Hibernate
* @author Nirmal Balasooriya
*
*/
@Entity
@Table(name = "book")
public class Book {
@Id
@GeneratedValue(strategy = GenerationType.AUTO)
private int id;
@Column(name = "ISBMNUMBER")
private String isbmNumber;
private String name;
private String description;
private String auther;
/**
*
* This is auto generated id from database
* @return the id
*
*/
public int getId() {
return id;
}
/**
*
* @param id the id to set
*
*/
public void setId(int id) {
this.id = id;
}
/**
*
* @return the isbmNumber
*
*/
public String getIsbmNumber() {
return isbmNumber;
}
/**
*
* @param isbmNumber the isbmNumber to set
*
*/
public void setIsbmNumber(String isbmNumber) {
this.isbmNumber = isbmNumber;
}
/**
*
* @return the name
*
*/
public String getName() {
return name;
}
/**
*
* @param name the name to set
*
*/
public void setName(String name) {
this.name = name;
}
/**
*
* @return the description
*
*/
public String getDescription() {
return description;
}
/**
*
* @param description the description to set
*
*/
public void setDescription(String description) {
this.description = description;
}
/**
*
* @return the auther
*
*/
public String getAuther() {
return auther;
}
/**
*
* @param auther the auther to set
*
*/
public void setAuther(String auther) {
this.auther = auther;
}
/**
*
* @param isbmNumber
* @param name
*
*/
public Book(String isbmNumber, String name) {
super();
this.isbmNumber = isbmNumber;
this.name = name;
}
/**
*
* @param isbmNumber
*
* @param name
* @param description
* @param auther
*
*/
public Book(String isbmNumber, String name, String description, String auther) {
super();
this.isbmNumber = isbmNumber;
this.name = name;
this.description = description;
this.auther = auther;
}
/**
*
*/
public Book() {
super();
}
/*
* (non-Javadoc)
*
* @see java.lang.Object#hashCode()
*
*/
@Override
public int hashCode() {
final int prime = 31;
int result = 1;
result = prime * result + ((isbmNumber == null) ? 0 : isbmNumber.hashCode());
return result;
}
/*
* (non-Javadoc)
*
* @see java.lang.Object#equals(java.lang.Object)
*
*/
@Override
public boolean equals(Object obj) {
if (this == obj)
return true;
if (obj == null)
return false;
if (getClass() != obj.getClass())
return false;
Book other = (Book) obj;
if (isbmNumber == null) {
if (other.isbmNumber != null)
return false;
} else if (!isbmNumber.equals(other.isbmNumber))
return false;
return true;
}
}
reader()
This is the method used to read the input file from our class path and it contains the row mapper of the each line which convert each columns in to Book object parameters.
writer()
This method contains the insertion query which used to write the each Book object in to the database.
step1()
This is the method we define the our step which read file from input file and then process it and write back to database.
Now we are completed the batch application. In order to run the application we have to perform maven install command. (Write click on project and go to Run As -> Maven Install) Then lets create our input folder inside the target folder and add the inputData.csv with following content.
11111,Aaaa,DDDa,nirmal
22222,Bbbb,DescriptionB,balasooriya
Then you will be able to see the generated jar file on target folder. Go to that folder and execute the jar file using following command.
java -jar SpringBatch-0.0.1-SNAPSHOT.jar
Then you will be able to see similar output on command line as below image.
And also if you see in your database you will be able to see data has inserted in to the table. If you see the Name and Arther columns they have been saved as upper case which we did in our processor.
You can access the source code on following GITHub location.
Then lets add our Spring Boot initializer class in to the project. Right click on project and go to New -> Class and provide class name as "AppInitializer" and package I would give as "com.nirmal.springbatch".
I will add following content in to out initializer class.
package com.nirmal.springbatch;
import javax.sql.DataSource;
import org.springframework.beans.factory.annotation.Autowired;
import org.springframework.boot.SpringApplication;
import org.springframework.boot.autoconfigure.SpringBootApplication;
import org.springframework.boot.builder.SpringApplicationBuilder;
import org.springframework.boot.web.servlet.support.SpringBootServletInitializer;
import org.springframework.context.annotation.ComponentScan;
import org.springframework.data.jpa.repository.config.EnableJpaRepositories;
/**
*
* Spring Boot initialization class of the SpringBatch project
*
* @author Nirmal Balasooriya
*
*
*/
@ComponentScan({ "com.nirmal.springbatch" })
@EnableJpaRepositories("com.nirmal.springbatch")
@SpringBootApplication(scanBasePackages = { "com.nirmal.springbatch" })
public class AppInitializer extends SpringBootServletInitializer {
@Autowired
DataSource dataSource;
@Override
protected SpringApplicationBuilder configure(SpringApplicationBuilder application) {
return application.sources(AppInitializer.class);
}
public static void main(String[] args) {
SpringApplication.run(AppInitializer.class, args);
}
}
Setup the Data Models
Lets create out Book table using following SQL.
CREATE TABLE `sample`.`BOOK` ( `ID` INT NOT NULL AUTO_INCREMENT , `ISBMNUMBER` VARCHAR(250) NOT NULL , `NAME` VARCHAR(500) NOT NULL , `DESCRIPTION` VARCHAR(1024) NULL , `AUTHER` VARCHAR(250) NULL , PRIMARY KEY (`ID`)) ENGINE = MyISAM;
Then lets create model class for this Book. Right click on project and add new class with name as "Book" and package as "com.nirmal.springbatch.model".
import javax.persistence.Column;
import javax.persistence.Entity;
import javax.persistence.GeneratedValue;
import javax.persistence.GenerationType;
import javax.persistence.Id;
import javax.persistence.Table;
/**
*
* Model class for map the BOOK table using Hibernate
* @author Nirmal Balasooriya
*
*/
@Entity
@Table(name = "book")
public class Book {
@Id
@GeneratedValue(strategy = GenerationType.AUTO)
private int id;
@Column(name = "ISBMNUMBER")
private String isbmNumber;
private String name;
private String description;
private String auther;
/**
*
* This is auto generated id from database
* @return the id
*
*/
public int getId() {
return id;
}
/**
*
* @param id the id to set
*
*/
public void setId(int id) {
this.id = id;
}
/**
*
* @return the isbmNumber
*
*/
public String getIsbmNumber() {
return isbmNumber;
}
/**
*
* @param isbmNumber the isbmNumber to set
*
*/
public void setIsbmNumber(String isbmNumber) {
this.isbmNumber = isbmNumber;
}
/**
*
* @return the name
*
*/
public String getName() {
return name;
}
/**
*
* @param name the name to set
*
*/
public void setName(String name) {
this.name = name;
}
/**
*
* @return the description
*
*/
public String getDescription() {
return description;
}
/**
*
* @param description the description to set
*
*/
public void setDescription(String description) {
this.description = description;
}
/**
*
* @return the auther
*
*/
public String getAuther() {
return auther;
}
/**
*
* @param auther the auther to set
*
*/
public void setAuther(String auther) {
this.auther = auther;
}
/**
*
* @param isbmNumber
* @param name
*
*/
public Book(String isbmNumber, String name) {
super();
this.isbmNumber = isbmNumber;
this.name = name;
}
/**
*
* @param isbmNumber
*
* @param name
* @param description
* @param auther
*
*/
public Book(String isbmNumber, String name, String description, String auther) {
super();
this.isbmNumber = isbmNumber;
this.name = name;
this.description = description;
this.auther = auther;
}
/**
*
*/
public Book() {
super();
}
/*
* (non-Javadoc)
*
* @see java.lang.Object#hashCode()
*
*/
@Override
public int hashCode() {
final int prime = 31;
int result = 1;
result = prime * result + ((isbmNumber == null) ? 0 : isbmNumber.hashCode());
return result;
}
/*
* (non-Javadoc)
*
* @see java.lang.Object#equals(java.lang.Object)
*
*/
@Override
public boolean equals(Object obj) {
if (this == obj)
return true;
if (obj == null)
return false;
if (getClass() != obj.getClass())
return false;
Book other = (Book) obj;
if (isbmNumber == null) {
if (other.isbmNumber != null)
return false;
} else if (!isbmNumber.equals(other.isbmNumber))
return false;
return true;
}
}
Creating Spring Batch configurations
First of all lets create Spring processor class for our project. I will name the class as "BookProcessor" inside "com.nirmal.springbatch.processor" package. In this processor I will set Book name and Arther upper case.
package com.nirmal.springbatch.processor;
import org.slf4j.Logger;
import org.slf4j.LoggerFactory;
import com.nirmal.springbatch.model.Book;
/**
* Intermediate processor class for the process books
* @author User
*
*/
private static final Logger log = LoggerFactory.getLogger(BookProcessor.class);
@Override
public Book process(Book book) throws Exception {
final String name = book.getName().toUpperCase();
final String auther = book.getAuther().toUpperCase();
final Book changedBook = new Book(book.getIsbmNumber(),name, book.getDescription(), auther);
log.info("Converting (" + book + ") into (" + changedBook + ")");
return changedBook;
}
}
Then lets create the Batch Configuration in the project.I will name the class as "BatchConfiguration" inside "com.nirmal.springbatch.config" package.
package com.nirmal.springbatch.config;
import org.springframework.batch.core.Job;
import org.springframework.batch.core.Step;
import org.springframework.batch.core.configuration.annotation.EnableBatchProcessing;
import org.springframework.batch.core.configuration.annotation.JobBuilderFactory;
import org.springframework.batch.core.configuration.annotation.StepBuilderFactory;
import org.springframework.batch.core.launch.support.RunIdIncrementer;
import org.springframework.batch.item.database.BeanPropertyItemSqlParameterSourceProvider;
import org.springframework.batch.item.database.JdbcBatchItemWriter;
import org.springframework.batch.item.file.FlatFileItemReader;
import org.springframework.batch.item.file.mapping.BeanWrapperFieldSetMapper;
import org.springframework.batch.item.file.mapping.DefaultLineMapper;
import org.springframework.batch.item.file.transform.DelimitedLineTokenizer;
import org.springframework.beans.factory.annotation.Autowired;
import org.springframework.context.annotation.Bean;
import org.springframework.context.annotation.Configuration;
import org.springframework.core.io.FileSystemResource;
import com.nirmal.springbatch.model.Book;
import com.nirmal.springbatch.processor.BookProcessor;
@Configuration
@EnableBatchProcessing
public class BatchConfiguration {
@Autowired
private JobBuilderFactory jobBuilderFactory;
@Autowired
private StepBuilderFactory stepBuilderFactory;
@Autowired
private org.apache.tomcat.jdbc.pool.DataSource datasource;
@Bean
public Job readCSVFilesJob() {
return jobBuilderFactory
.get("readCSVFilesJob")
.incrementer(new RunIdIncrementer())
.start(step1())
.build();
}
@Bean
public Step step1() {
return stepBuilderFactory.get("step1").<Book, Book>chunk(5)
.reader(reader())
.processor(new BookProcessor())
.writer(writer())
.build();
}
@SuppressWarnings({ "rawtypes", "unchecked" })
@Bean
public FlatFileItemReader<Book> reader()
{
FlatFileItemReader<Book> flatFileItemReader = new FlatFileItemReader<Book>();
//Read input file from location
flatFileItemReader.setResource(new FileSystemResource("input/inputData.csv"));
//Set number of lines to skips. Use it if file has header rows.
//reader.setLinesToSkip(1);
//Configure values using mapper
flatFileItemReader.setLineMapper(new DefaultLineMapper() {
{
//3 read each columns from csv
setLineTokenizer(new DelimitedLineTokenizer() {
{
setNames(new String[] { "isbmNumber", "name", "description", "auther" });
}
});
//Set values in Book class
setFieldSetMapper(new BeanWrapperFieldSetMapper<Book>() {
{
setTargetType(Book.class);
}
});
}
});
return flatFileItemReader;
}
/**
* JDBCBatch Item writer
* @return
*/
@Bean
public JdbcBatchItemWriter<Book> writer() {
JdbcBatchItemWriter<Book> itemWriter = new JdbcBatchItemWriter<Book>();
itemWriter.setDataSource(datasource);
itemWriter.setSql("INSERT INTO BOOK (ISBMNUMBER, NAME, DESCRIPTION, AUTHER) VALUES (:isbmNumber, :name, :description, :auther)");
itemWriter.setItemSqlParameterSourceProvider(new BeanPropertyItemSqlParameterSourceProvider<Book>());
return itemWriter;
}
}
import org.slf4j.Logger;
import org.slf4j.LoggerFactory;
import com.nirmal.springbatch.model.Book;
/**
* Intermediate processor class for the process books
* @author User
*
*/
public class BookProcessor implements org.springframework.batch.item.ItemProcessor<Book, Book > {
private static final Logger log = LoggerFactory.getLogger(BookProcessor.class);
@Override
public Book process(Book book) throws Exception {
final String name = book.getName().toUpperCase();
final String auther = book.getAuther().toUpperCase();
final Book changedBook = new Book(book.getIsbmNumber(),name, book.getDescription(), auther);
log.info("Converting (" + book + ") into (" + changedBook + ")");
return changedBook;
}
}
Then lets create the Batch Configuration in the project.I will name the class as "BatchConfiguration" inside "com.nirmal.springbatch.config" package.
package com.nirmal.springbatch.config;
import org.springframework.batch.core.Job;
import org.springframework.batch.core.Step;
import org.springframework.batch.core.configuration.annotation.EnableBatchProcessing;
import org.springframework.batch.core.configuration.annotation.JobBuilderFactory;
import org.springframework.batch.core.configuration.annotation.StepBuilderFactory;
import org.springframework.batch.core.launch.support.RunIdIncrementer;
import org.springframework.batch.item.database.BeanPropertyItemSqlParameterSourceProvider;
import org.springframework.batch.item.database.JdbcBatchItemWriter;
import org.springframework.batch.item.file.FlatFileItemReader;
import org.springframework.batch.item.file.mapping.BeanWrapperFieldSetMapper;
import org.springframework.batch.item.file.mapping.DefaultLineMapper;
import org.springframework.batch.item.file.transform.DelimitedLineTokenizer;
import org.springframework.beans.factory.annotation.Autowired;
import org.springframework.context.annotation.Bean;
import org.springframework.context.annotation.Configuration;
import org.springframework.core.io.FileSystemResource;
import com.nirmal.springbatch.model.Book;
import com.nirmal.springbatch.processor.BookProcessor;
@Configuration
@EnableBatchProcessing
public class BatchConfiguration {
@Autowired
private JobBuilderFactory jobBuilderFactory;
@Autowired
private StepBuilderFactory stepBuilderFactory;
@Autowired
private org.apache.tomcat.jdbc.pool.DataSource datasource;
@Bean
public Job readCSVFilesJob() {
return jobBuilderFactory
.get("readCSVFilesJob")
.incrementer(new RunIdIncrementer())
.start(step1())
.build();
}
@Bean
public Step step1() {
return stepBuilderFactory.get("step1").<Book, Book>chunk(5)
.reader(reader())
.processor(new BookProcessor())
.writer(writer())
.build();
}
@SuppressWarnings({ "rawtypes", "unchecked" })
@Bean
public FlatFileItemReader<Book> reader()
{
FlatFileItemReader<Book> flatFileItemReader = new FlatFileItemReader<Book>();
//Read input file from location
flatFileItemReader.setResource(new FileSystemResource("input/inputData.csv"));
//Set number of lines to skips. Use it if file has header rows.
//reader.setLinesToSkip(1);
//Configure values using mapper
flatFileItemReader.setLineMapper(new DefaultLineMapper() {
{
//3 read each columns from csv
setLineTokenizer(new DelimitedLineTokenizer() {
{
setNames(new String[] { "isbmNumber", "name", "description", "auther" });
}
});
//Set values in Book class
setFieldSetMapper(new BeanWrapperFieldSetMapper<Book>() {
{
setTargetType(Book.class);
}
});
}
});
return flatFileItemReader;
}
/**
* JDBCBatch Item writer
* @return
*/
@Bean
public JdbcBatchItemWriter<Book> writer() {
JdbcBatchItemWriter<Book> itemWriter = new JdbcBatchItemWriter<Book>();
itemWriter.setDataSource(datasource);
itemWriter.setSql("INSERT INTO BOOK (ISBMNUMBER, NAME, DESCRIPTION, AUTHER) VALUES (:isbmNumber, :name, :description, :auther)");
itemWriter.setItemSqlParameterSourceProvider(new BeanPropertyItemSqlParameterSourceProvider<Book>());
return itemWriter;
}
}
reader()
This is the method used to read the input file from our class path and it contains the row mapper of the each line which convert each columns in to Book object parameters.
writer()
This method contains the insertion query which used to write the each Book object in to the database.
step1()
This is the method we define the our step which read file from input file and then process it and write back to database.
Now we are completed the batch application. In order to run the application we have to perform maven install command. (Write click on project and go to Run As -> Maven Install) Then lets create our input folder inside the target folder and add the inputData.csv with following content.
11111,Aaaa,DDDa,nirmal
22222,Bbbb,DescriptionB,balasooriya
Then you will be able to see the generated jar file on target folder. Go to that folder and execute the jar file using following command.
java -jar SpringBatch-0.0.1-SNAPSHOT.jar
Then you will be able to see similar output on command line as below image.
 |
| After run the jar file you will be able to see similar output as this |
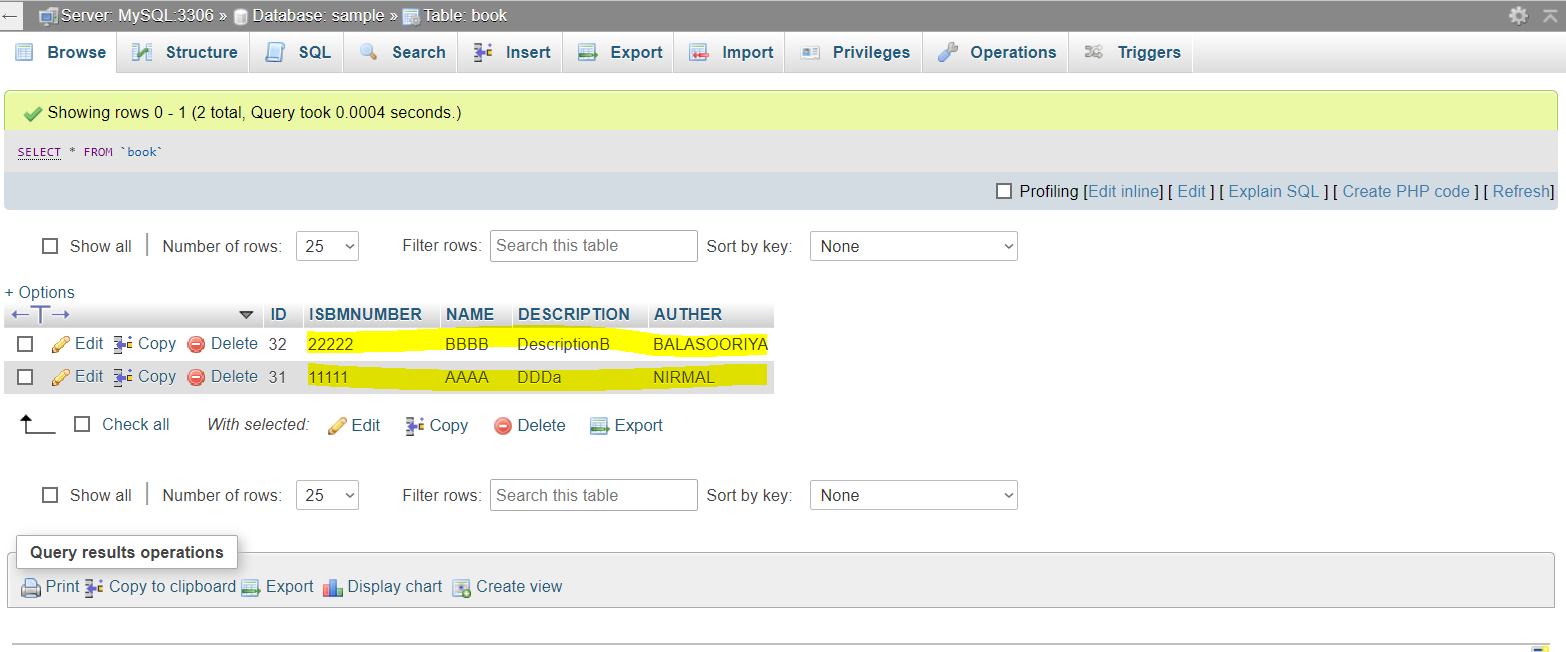 |
| Data in CSV file uploaded in to |
You can access the source code on following GITHub location.


