This post I'm going to explain how to use JBoss Hibernate Tools to generate model classes from Database table structure.
Prerequisites
- You should have install java in your PC and set path variable correctly (JAVA_HOME, JRE_HOME)
- You should have install Eclipse IDE (In this post I'm Using Eclipse NEON)
01) Install JBoss Tools in the Eclipse
Open Eclipse IDE and go to Help -> Add new Software .. Then past the URL related to your Eclipse version for Indego it would be "http://download.jboss.org/jbosstools/updates/development/indigo/" click on the Add button. Then provide the name and click Ok. As show in below Figure. Note that different Eclipse versions will have different Installation URLs, You can refer to the appropriate URL on following location http://tools.jboss.org/downloads/overview.html.
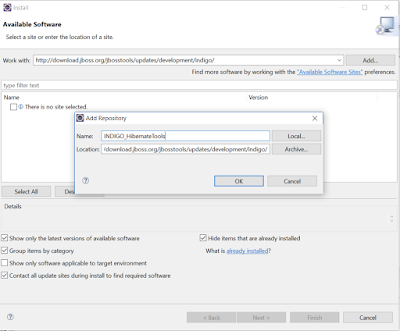 |
| Provide name for the URL then click ok |
Then Select only Hibernate Tool related things as show in below figure and click next and install it. Note that it will take some time to download and install it.
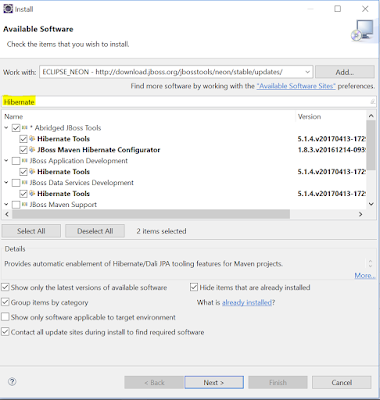 |
| After Adding Hibernate filter select all the listed items and click next |
After installation you may ask to restart the Eclipse, then when you go to File -> New -> Other wizard you can see the Hibernate option as show in below figure.
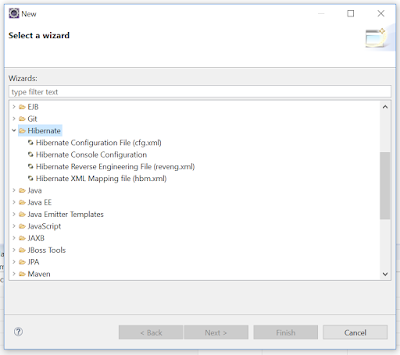 |
| Hibernate Tool component |
02) Lets create model classes for Database tables
First we have to have some sample database structure to generate model classes for those. For that I'll use following SQL to generate sample Table structure. Note that I have created "blog" schema to create this table in MySQL.
I'll create the Table PERSON using following SQL.
CREATE TABLE `PERSON` (
`ID` int(11) NOT NULL AUTO_INCREMENT,
`COUNTRY` varchar(30) DEFAULT NULL,
`NAME` varchar(30) DEFAULT NULL,
`ADRESS` varchar(90) DEFAULT NULL,
`AGE` int,
PRIMARY KEY (`ID`)
) ENGINE=InnoDB DEFAULT CHARSET=latin1;
Then lets create simple java project to Generate the model class for this table. Note that set run time environment as JDK 1.7 or above when you create the project. (I created project call CodeGenerator)
Then go to Windows -> Perspective -> Open Perspective - > Other then Select Hibernate and click OK as show in below figure.
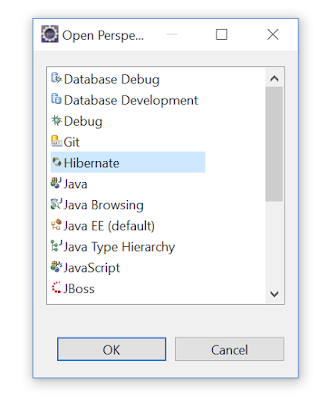 |
| Select Hibernate perspective. |
Then right click on the Project you generated and create new folder under the project call "resources" and add hibernate configuration file (blog_hibernate.cfg.xml) in there. My hibernate configuration file contain following content.
<?xml version="1.0" encoding="UTF-8"?>
<!DOCTYPE hibernate-configuration PUBLIC
"-//Hibernate/Hibernate Configuration DTD 3.0//EN"
"http://www.hibernate.org/dtd/hibernate-configuration-3.0.dtd">
<hibernate-configuration>
<session-factory>
<property name="hibernate.connection.driver_class">com.mysql.jdbc.Driver</property>
<property name="hibernate.connection.password">password</property>
<property name="hibernate.connection.url">jdbc:mysql://localhost:3306/blog</property>
<property name="hibernate.connection.username">root</property>
</session-factory>
</hibernate-configuration>
Then go to Hibernate perspective and right click on the Hibernate Configurations section. Then click on "Add configuration" as show on below figure.
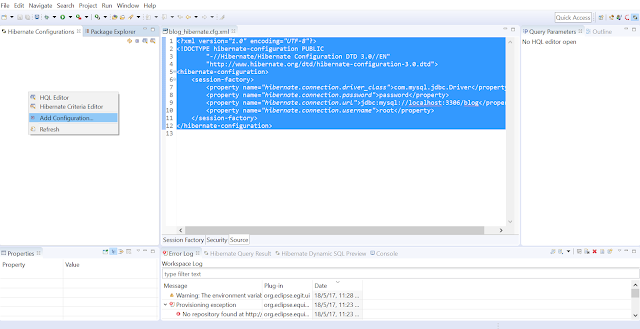 |
| Click on Add Configuration section. |
Then on the Form provide a Name for the configuration and then select the project by browse. Then setup the database connection by click on new button beside the database connection input field.
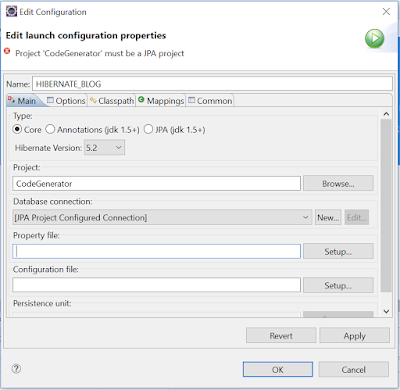 |
| Configuration popup interface |
When click on New it will come another popup interface to provide database details. In my case I'll select database as MySQL then click next and provide databse URL, user name and password. Also you may need to provide the "mysql-connector-java" jar file as well.
Then click on Setup button beside the Configuration input field. Then select use existing option then select the "blog_hibernate.cfg.xml" file which we have created in previous step. Then apply changes and click OK. Final interface would be similar to below figure.
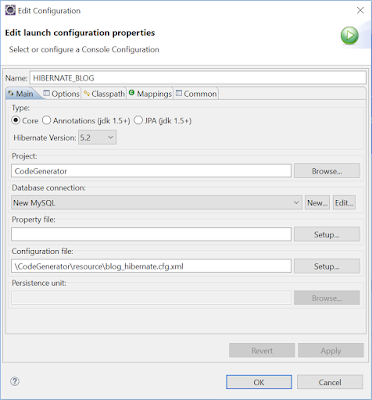 |
| Final interface of Configuration setup |
03) Generate the models
Then click on the "Hibernate Code Generation Configuration.." as show on below figure.
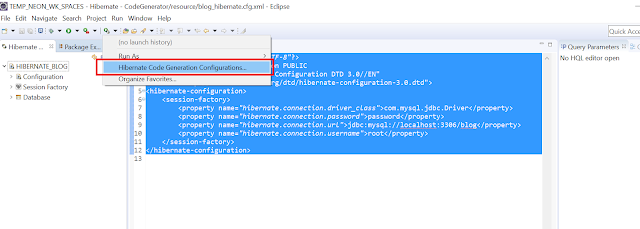 |
| click on Hibernate Code Generation Configuration.. |
Then double click on Code Generation Configuration on the panel.Then select the console configuration which we created on previous step. Then select the folder you need to generate the classes. Then check the "reverse engineer from JDBC connection" check box. Then provide the package you need to have on model classes.
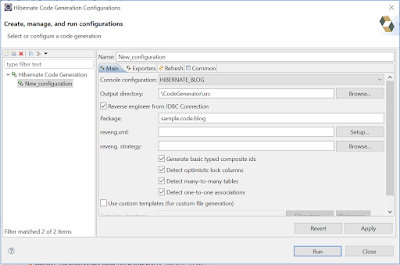 |
| Configuration details |
Then click on Exporters tab and check the "Use Java 5 Syntax" and "Generate EJB3 annotations" check boxes. Then check the "Domain Object (.java)" check box as well. Please refer the below figure.
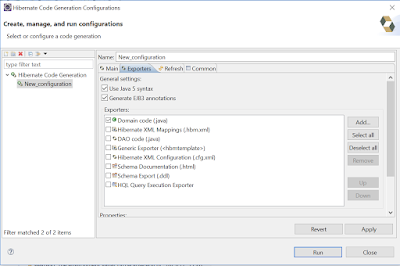 |
| Exporters tab |
Then go to Common tab and then select the Encoding as "UTF-8" refer to the below figure.
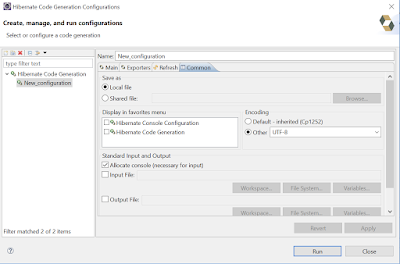 |
| Encoding Tab |
Then click on the Run button and you will be able to see similar output as below figure.
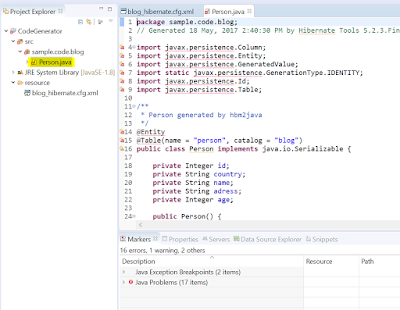 |
| Generated model using JBoss Tool |
04) Now lets persist data using the Generated Model
First lets create Maven project on eclipse, I created maven project with artifact ID "JBossToolsTest" with group ID "com.it.blog". Then updated pom file as below.
<project xmlns="http://maven.apache.org/POM/4.0.0" xmlns:xsi="http://www.w3.org/2001/XMLSchema-instance" xsi:schemaLocation="http://maven.apache.org/POM/4.0.0 http://maven.apache.org/xsd/maven-4.0.0.xsd">
<modelVersion>4.0.0</modelVersion>
<groupId>com.it.blog</groupId>
<artifactId>JBossToolsTest</artifactId>
<version>0.0.1-SNAPSHOT</version>
<properties>
<hibernate.version>4.3.5.Final</hibernate.version>
</properties>
<dependencies>
<dependency>
<groupId>junit</groupId>
<artifactId>junit</artifactId>
<version>3.8.1</version>
<scope>test</scope>
</dependency>
<!-- MySQL database driver -->
<dependency>
<groupId>mysql</groupId>
<artifactId>mysql-connector-java</artifactId>
<version>5.1.9</version>
</dependency>
<!-- Hibernate -->
<dependency>
<groupId>org.hibernate</groupId>
<artifactId>hibernate-core</artifactId>
<version>${hibernate.version}</version>
</dependency>
<dependency>
<groupId>org.hibernate</groupId>
<artifactId>hibernate-entitymanager</artifactId>
<version>${hibernate.version}</version>
</dependency>
<dependency>
<groupId>org.hibernate</groupId>
<artifactId>hibernate-validator</artifactId>
<version>5.1.3.Final</version>
</dependency>
<!-- Hibernate library dependecy start -->
<dependency>
<groupId>dom4j</groupId>
<artifactId>dom4j</artifactId>
<version>1.6.1</version>
</dependency>
<dependency>
<groupId>commons-logging</groupId>
<artifactId>commons-logging</artifactId>
<version>1.1.1</version>
</dependency>
<dependency>
<groupId>commons-collections</groupId>
<artifactId>commons-collections</artifactId>
<version>3.2.1</version>
</dependency>
<dependency>
<groupId>cglib</groupId>
<artifactId>cglib</artifactId>
<version>2.2</version>
</dependency>
<!-- Hibernate library dependecy end -->
<dependency>
<groupId>javax.transaction</groupId>
<artifactId>jta</artifactId>
<version>1.1</version>
</dependency>
</dependencies>
</project>
Then copy the generated Person class in to src folder. Then created a "hibernate.cfg.xml" in resource folder with following content.
<?xml version="1.0" encoding="utf-8"?>
<!DOCTYPE hibernate-configuration PUBLIC
"-//Hibernate/Hibernate Configuration DTD 3.0//EN"
"http://www.hibernate.org/dtd/hibernate-configuration-3.0.dtd">
<hibernate-configuration>
<session-factory>
<property name="hibernate.connection.driver_class">com.mysql.jdbc.Driver</property>
<property name="hibernate.connection.url">jdbc:mysql://localhost:3306/blog</property>
<property name="hibernate.connection.username">root</property>
<property name="hibernate.connection.password">password</property>
<property name="hibernate.dialect">org.hibernate.dialect.MySQLDialect</property>
<property name="show_sql">true</property>
<mapping class="sample.code.blog.Person" />
</session-factory>
</hibernate-configuration>
Then created the main class(MainClass) under "sample.code.blog.main" package and the class content as below.
package sample.code.blog.main;
import org.hibernate.Session;
import org.hibernate.SessionFactory;
import org.hibernate.cfg.Configuration;
import sample.code.blog.Person;
public class MainClass {
public static void main(String[] args) {
System.out.println("Hibernate one to one (Annotation)");
Session session = getSessionFactory().openSession();
session.beginTransaction();
Person person = new Person();
person.setAge(21);
person.setAdress("My Address");
person.setCountry("SL");
person.setName("Nirmal");
session.save(person);
session.getTransaction().commit();
System.out.println("Done");
}
private static final SessionFactory sessionFactory = buildSessionFactory();
private static SessionFactory buildSessionFactory() {
try {
// Create the SessionFactory from hibernate.cfg.xml
return new Configuration().configure().buildSessionFactory();
} catch (Throwable ex) {
// Make sure you log the exception, as it might be swallowed
System.err.println("Initial SessionFactory creation failed." + ex);
throw new ExceptionInInitializerError(ex);
}
}
public static SessionFactory getSessionFactory() {
return sessionFactory;
}
public static void shutdown() {
// Close caches and connection pools
getSessionFactory().close();
}
}
Now we have developed the programe to persist Person object into database and then we can right click on the MainClass and run. You should be able to view similar output to below figure.
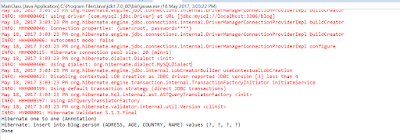 |
| Output once you run the MainClass |
Also you can check the Database as well. You should be able to see following content on the table.
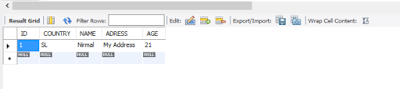 |
| Table with inserted data |
So I believe now you have some idea about the steps which developers needed follow in order to generate model classes using JBoss Tools. You can access the Project in following GITHUB location https://github.com/NirmalBalasooriya/JBossToolsTest.


