Showing posts with label CXF REST. Show all posts

Friday, March 13, 2020

Setup MICROSOFT SQL SERVER Data source in JBoss EAP 7.1

In this post I will demonstrate how to setup Microsoft SQL Server Data source in JBoss EAP 7.1. I will use code base of my previous post "Passing spring application parameters in EAP 7.1"(Initial code base)

Prerequisites 


  1. You should have install java 1.8 or above.
  2. You should have Eclipse installed in your PC.
  3. Your PC should setup Maven installed and configured.
  4. Your PC should have installed MySQL and Server need to have user who have access to the configured database and user should able to log in to the database by user name/password. 

Install MSSQL driver in JBoss EAP

First lets download a JDBC Driver based on SQLServer version. You can download the JDBC Driver from Microsoft's site: https://docs.microsoft.com/en-us/sql/connect/jdbc/microsoft-jdbc-driver-for-sql-server

I downloaded the "sqljdbc4-2.0.jar" which compatible with my SQL server version. Lets keep the downloaded jar in temporary folder. In my case I'll keep it on "G:/" drive. 


So lets use "JBoss-cli" in order to add the Driver and JNDI in to EAP. You can find the jboss-cli in <JBOSS_HOM>/bin directory.

You can start the EAP first by double click on standalone.bat and then start jboss-cli by double click jboss-cli.jar.

Then you can enter connect command in order to connect to EAP.

connect

Then you can enter following command

module add --name=sqlserver.jdbc --resources=@INSTALL_FOLDER@/libext/jtds-1.3.1.jar --dependencies=javax.api,javax.transaction.api
/subsystem=datasources/jdbc-driver=sqlserver:add(driver-module-name=sqlserver.jdbc,driver-name=sqlserver,driver-class-name=@JDBC_DRIVER@)
/subsystem=datasources/data-source=@DATASOURCENAME@:add(jndi-name=java:jboss/@JNDI_NAME@,enabled="true",use-java-context="true",driver-name=sqlserver,connection-url="@JDBC_URL@",user-name=@JDBC_USER@,password=@JDBC_PASSWORD@,validate-on-match=true,background-validation=true)

This is stranded command which you can replace with your parameters. So based on my parameter details Command would be something like below. I have highlighted the modifications which I have done.


module add --name=sqlserver.jdbc --resources=G:\sqljdbc4-2.0.jar --dependencies=javax.api,javax.transaction.api
/subsystem=datasources/jdbc-driver=sqlserver:add(driver-module-name=sqlserver.jdbc,driver-name=sqlserver,driver-class-name=com.microsoft.sqlserver.jdbc.SQLServerDriver)
/subsystem=datasources/data-source=MSSQLDATASOURCE:add(jndi-name=java:jboss/MSSQLJNDI,enabled="true",use-java-context="true",driver-name=sqlserver,connection-url="jdbc:sqlserver://localhost;databaseName=TestDB",user-name=nirmal,password=Test123_,validate-on-match=true,background-validation=true)

Once you run the command you should be able to see following output in jboss-cli.


Then also you can see following section has been added in to the standalone.xml


Lets configure Application to read JNDI

In order to read the DataSource details from JNDI just need to add JNDI string in to Spring Boot application.properties file. I have added spring.datasource.jndi-name=java:jboss/MSSQLJNDI@ application.properties file. (Note that I have commented previous datasource configuration details )

#==== connect to MSSQL ======#
#spring.jpa.hibernate.ddl-auto=update
#spring.datasource.url=jdbc:sqlserver://localhost;databaseName=TestDB
##spring.datasource.username=nirmal
##spring.datasource.password=Test123_
#spring.datasource.driverClassName=com.microsoft.sqlserver.jdbc.SQLServerDriver
#spring.jpa.database-platform=org.hibernate.dialect.SQLServer2012Dialect
server.port = 8080
spring.datasource.jndi-name=java:jboss/MSSQLJNDI@

spring.jpa.properties.hibernate.show_sql=true
spring.jpa.properties.hibernate.use_sql_comments=false
spring.jpa.properties.hibernate.format_sql=true

#==== Logging configurations ======#
logging.level.root=WARN,INFO,ERROR
logging.level.com.baeldung=TRACE


Then lets deploy the war file. For that click on Back button on left top corner and then click on deployments. Then click "Add" button. Then you should be able to see similar figure to below.


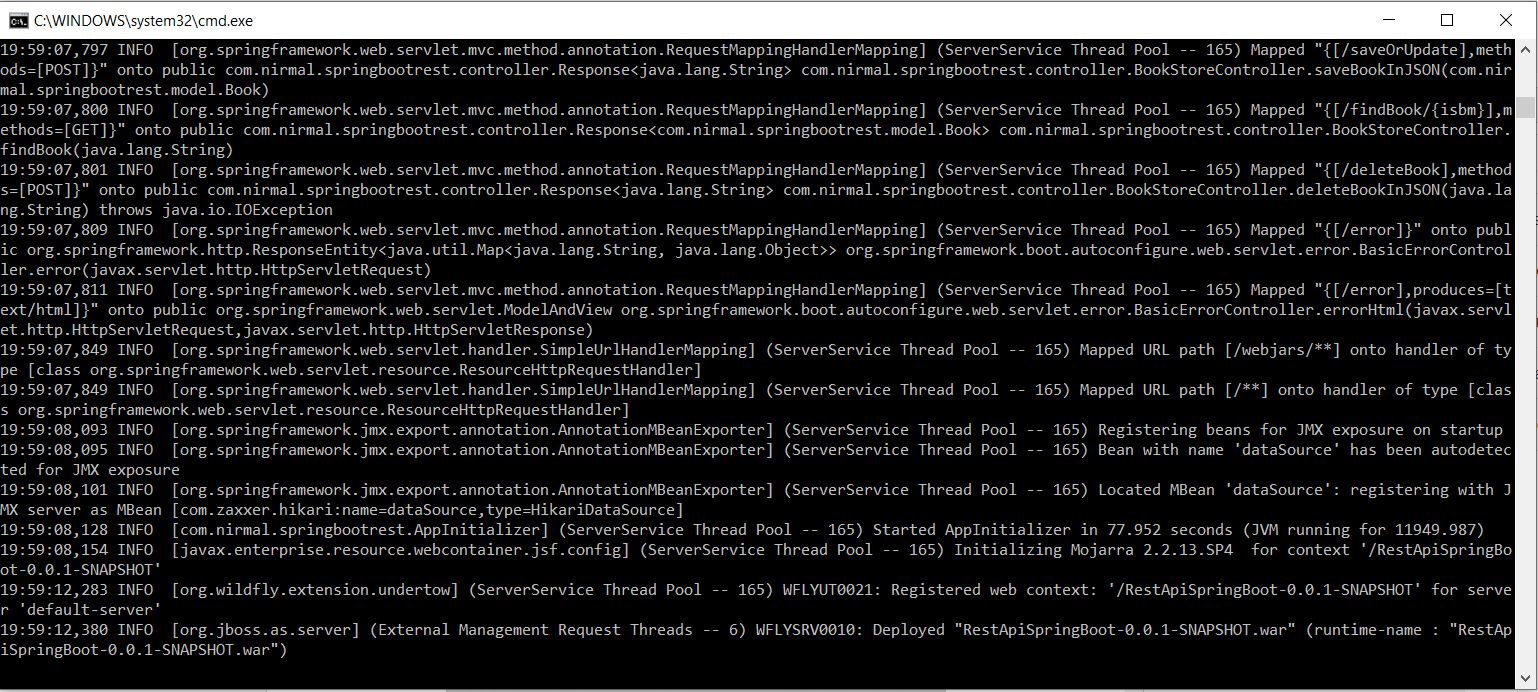
Then click next button and then Click choose file and select the generated war file from target folder in the project. Then click next and then click finish. Once installation completed you should be able to see similar output on command line.


Also you can perform any action which I mentioned in my previous blog post.

Project source can be downloaded from following GIT HUB URL.


Thursday, March 5, 2020

Passing spring application parameters in EAP 7.1

In this post I will demonstrate how to pass Spring application properties in Spring Boot spring boot application running on JBoss EAP. I will use code base of my previous post "SpringBott change default port"(Initial code base)

Prerequisites 


  1. You should have install java 1.8 or above.
  2. You should have Eclipse installed in your PC.
  3. Your PC should setup Maven installed and configured.
  4. Your PC should have installed MySQL and Server need to have user who have access to the configured database and user should able to log in to the database by user name/password. 


Enable existing project to run on EAP

When Spring boot application developed it's have its embedded tomcat. So we have to remove that embedded tomcat in order to run the same project in EAP. Also I have make the project packaging as war file so we can deploy the project in to EAP.


<project xmlns="http://maven.apache.org/POM/4.0.0" xmlns:xsi="http://www.w3.org/2001/XMLSchema-instance" xsi:schemaLocation="http://maven.apache.org/POM/4.0.0 http://maven.apache.org/xsd/maven-4.0.0.xsd">
  <modelVersion>4.0.0</modelVersion>
  <groupId>com.nirmal.springbootrest</groupId>
  <artifactId>RestApiSpringBoot</artifactId>
  <version>0.0.1-SNAPSHOT</version>
<packaging>war</packaging>
<parent>
        <groupId>org.springframework.boot</groupId>
        <artifactId>spring-boot-starter-parent</artifactId>
        <version>2.0.5.RELEASE</version>
    </parent>
<dependencies>
<!-- Compile -->
<dependency>
<groupId>org.springframework.boot</groupId>
<artifactId>spring-boot-starter-web</artifactId>
<exclusions>
<exclusion>
<groupId>org.springframework.boot</groupId>
<artifactId>spring-boot-starter-tomcat</artifactId>
</exclusion>
</exclusions>
</dependency>
        <dependency>
            <groupId>org.springframework.boot</groupId>
            <artifactId>spring-boot-starter-data-jpa</artifactId>
        </dependency>
<dependency>
<groupId>javax.servlet</groupId>
<artifactId>jstl</artifactId>
</dependency>
<!-- Provided -->
  <dependency>
   <groupId>org.apache.tomcat.embed</groupId>
   <artifactId>tomcat-embed-jasper</artifactId>
   <scope>provided</scope>
  </dependency>
<!-- Runtime -->
<dependency>
<groupId>com.microsoft.sqlserver</groupId>
<artifactId>mssql-jdbc</artifactId>
<version>6.1.0.jre8</version>
</dependency>
</dependencies>
<build>
<plugins>
<plugin>
<groupId>org.springframework.boot</groupId>
<artifactId>spring-boot-maven-plugin</artifactId>
</plugin>
</plugins>
</build>
</project>

Then lets remove some required parameters from application.properties file as show in below. I have highlighted the commented part.

#==== connect to mysql ======#
spring.jpa.hibernate.ddl-auto=update
spring.datasource.url=jdbc:sqlserver://localhost;databaseName=TestDB
#spring.datasource.username=nirmal
#spring.datasource.password=Test123_
spring.datasource.driverClassName=com.microsoft.sqlserver.jdbc.SQLServerDriver
spring.jpa.database-platform=org.hibernate.dialect.SQLServer2012Dialect
server.port = 8080

spring.jpa.properties.hibernate.show_sql=true
spring.jpa.properties.hibernate.use_sql_comments=false
spring.jpa.properties.hibernate.format_sql=true

#==== Logging configurations ======#
logging.level.root=WARN,INFO,ERROR
logging.level.com.baeldung=TRACE


Perform maven install

I will demonstrate it from IntelliJ as mention below. First perform maven install command by double click on "install" under maven in InelliJ as show below.


Then after successful installation you can see generated war file in target folder. 


Add application properties in EAP

First lets run the JBoss EAP. For that go to the JBOSS directory and navigate to "bin" folder. Then run the "standalone.bat" in windows. (In linux run the standalone.sh file). Once EAP started you can go to Admin console in following URL. http://localhost:9990/console/App.html

Enter the admin username and password when accessing the URL. Then you should be able to see EAP web application. Then click on Configuration tab and then click on system properties. Then you should be able to see similar UI to below screen. Then click on view button.


Then you should be able to see similar image to below figure. 


In order to add parameters click on Add button. Then add following details 

namevalue
spring.datasource.usernamenirmal
spring.datasource.passwordTest123_


After add those you can see similar to below figure.


Then lets deploy the war file. For that click on Back button on left top corner and then click on deployments. Then click "Add" button. Then you should be able to see similar figure to below.


Then click next button and then Click choose file and select the generated war file from target folder in the project. Then click next and then click finish. Once installation completed you should be able to see similar output on command line.


Now server started on 8090 and you should be able to access same web service from following like.


Also you can perform any action which I mentioned in my previous blog post.

Project source can be downloaded from following GIT HUB URL.


Monday, February 17, 2020

External Active MQ + Hibernate with JBoss FUSE 7.4

In this post I will demonstrate how to configure External Active MQ with JPA implementation of Hibernate on Karaf platform on JBoss fuse 7.4. I will use previous JPA project as code base to start the development. You can refer about it from my previous blog post.


Prerequisites 


  1. You should have install java 1.8 or above.
  2. You should have IDE installed in your PC in my case I'm using IntelliJ IDEA.
  3. Your PC should setup Maven installed and configured.
  4. Your  PC should install and setup SQLServer.
  5.  Checkout base project from JPA project as code base.


Application module Dependency 

First Lets add relevant dependencies in to Application POM file. Following is the full feature file content and updated part on bold font. Since we are using ActiveMQ we need to add relevant dependency for that.


<?xml version="1.0" encoding="UTF-8"?>
<features name="osgi-customer-management-${project.version}" xmlns="http://karaf.apache.org/xmlns/features/v1.3.0" xmlns:xsi="http://www.w3.org/2001/XMLSchema-instance"
          xsi:schemaLocation="http://karaf.apache.org/xmlns/features/v1.3.0 http://karaf.apache.org/xmlns/features/v1.3.0">
    <feature name="osgi-customer-management-datasource" version="${project.version}">
        <config name="org.ops4j.datasource-customer-management">
            osgi.jdbc.driver.class=com.microsoft.sqlserver.jdbc.SQLServerDriver
            osgi.jdbc.driver.name=mssql
            databaseName=customer-management
            url=jdbc:sqlserver://LAPTOP-E0A1RCAN:1433;databaseName=customer-management
            user=nirmal
            password=Test123_
            dataSourceName=customer-management
            org.apache.karaf.features.configKey = org.ops4j.datasource-customer-management
        </config>
        <capability>osgi.service;javax.persistence.EntityManager;objectClass=javax.sql.DataSource;osgi.jndi.service.name=customer-management</capability><!--;effective:=active-->
    </feature>
    <feature name="Model" version="${project.version}">
        <feature>transaction</feature>
        <feature>jndi</feature>
        <feature>pax-jdbc-config</feature>
        <feature>pax-jdbc-h2</feature>
        <feature>pax-jdbc-mssql</feature>
        <feature>pax-jdbc-pool-dbcp2</feature>
        <feature>jdbc</feature>
        <feature>pax-jms-pool</feature>
        <feature>pax-jms-config</feature>
        <feature>camel-activemq</feature>
        <feature>artemis-jms-client</feature>
        <feature>pax-jms-artemis</feature>
        <feature>camel-blueprint</feature>
        <feature>camel-jms</feature>
        <feature>camel-activemq</feature>
        <feature>pax-jms-activemq</feature>
        <feature dependency="true">aries-blueprint</feature>
        <feature version="[2,3)">jpa</feature>
        <feature version="[5,6)">hibernate</feature>
        <bundle>mvn:com.fuse.hibernate.example/Model/${project.version}</bundle>
    </feature>
    <feature name="Service" version="${project.version}">
        <feature version="${project.version}">Model</feature>
        <bundle>mvn:com.fuse.hibernate.example/Service/${project.version}</bundle>
        <capability>osgi.service;objectClass=javax.persistence.spi.PersistenceProvider;effective:=active;javax.persistence.provider=org.hibernate.jpa.HibernatePersistenceProvider</capability>
    </feature>
    <feature name="Application" version="${project.version}">
        <feature version="${project.version}">Model</feature>
        <feature version="${project.version}">Service</feature>
        <bundle>mvn:com.fuse.hibernate.example/Application/${project.version}</bundle>
    </feature>
</features>


Defining the ActiveMQ endpoint in BluePrint  


We can add ActiveMQ endpoint in to our BlurPrint.xml file in the Application module. We just need to modify following content which colored in bold. 

<?xml version="1.0" encoding="UTF-8"?>
<blueprint xmlns="http://www.osgi.org/xmlns/blueprint/v1.0.0" xmlns:jpa="http://aries.apache.org/xmlns/jpa/v2.0.0" xmlns:tx="http://aries.apache.org/xmlns/transactions/v1.2.0"
  xmlns:xsi="http://www.w3.org/2001/XMLSchema-instance"
           xsi:schemaLocation="http://www.osgi.org/xmlns/blueprint/v1.0.0 https://www.osgi.org/xmlns/blueprint/v1.0.0/blueprint.xsd
             http://camel.apache.org/schema/blueprint http://camel.apache.org/schema/blueprint/camel-blueprint.xsd">
  <jpa:enable />
  <tx:enable-annotations />
  <service ref="personService" interface="com.fuse.hibernate.example.service.PersonService" />
  <bean id="personService" class="com.fuse.hibernate.example.service.PersonServiceImpl" />
  <bean
          class="com.fuse.hibernate.example.app.ExchangeProcessor" id="exchangeProcessor">
    <property name="personService" ref="personService"/>
  </bean>
  <bean id="activemq" class="org.apache.activemq.camel.component.ActiveMQComponent">
    <property name="brokerURL" value="tcp://localhost:61616"/>
  </bean>

  <camelContext xmlns="http://camel.apache.org/schema/blueprint"
                id="cbr-example-context" >
    <route id="cbr-route" >
      <from uri="file:work/cbr/input" />
      <log message="Sending order ${file:name} to another country" />
      <log id="logStatusIncident" message="OrderDetails Call ${body}"/>
      <to uri="file:work/cbr/output/others" />
      <convertBodyTo type="java.lang.String"/>
      <process ref="exchangeProcessor"/>
      <log  message="${body}" />

    </route>

    <route id="ACTIVEMQ">
      <from uri="activemq:queue:inbound.queue"/>
      <process ref="exchangeProcessor"/>
      <log  message="${body}" />
    </route>
  </camelContext>

</blueprint>


Explanation of the route "ACTIVEMQ"
It will read messages from "inbound.queue" and then it will pass to the "exchangeProcessor"  which have the responsibility of saving the message that passing from the queue.


Installing in to FUSE 7.4

We can use same set of commands except one new dependency addition code. In order to add dependencies first we have to run the fuse.bat file and then go to the console and enter following commands one by one. Only the third command new from previous post.


osgi:install -s mvn:com.microsoft.sqlserver/mssql-jdbc/7.4.1.jre8

osgi:install -s mvn:org.ops4j.pax.jdbc/pax-jdbc-mssql/1.3.5

osgi:install -s mvn:org.apache.cxf/cxf-rt-rs-client/3.0.4.redhat-621084


Then lets install application by entering following commands one by one


feature:repo-add mvn:com.fuse.hibernate.example/Feature/1.0-SNAPSHOT/xml


feature:install osgi-customer-management-datasource


feature:install Model

feature:install Service

feature:install Application


Then after "list" command you should be able to see all the things we installed. Similar to below figure.

After Successful installation LIST command should return something similar to this.

You can verify by accessing http://localhost:8181/cxf/ link you should be able to see following UI in browser.

http://localhost:8181/cxf/ output once successfully installed the Application 

Now you can click the WADL link and see the defined endpoints in there.

WADL output for defined REST service.
If you check the "http://localhost:8181/hawtio/camel/routes" then you should be able to see similar figure to below figure.

hawtio camel routes 

Lets run ActiveMQ server


In order to demonstrate this we need to have ActiveMQ server run in our local PC. First lets download it from official web page in following location. Then extract it in to your local PC and then go to apache-activemq-5.15.11\bin\win64 location from extraction parent directory. Then run the activemq.bat to start our ActiveMQ server.


Then you can go to http://localhost:8161/admin/queues.jsp URL and see your available Queues in PC. Since we have note created any you suppose to see similar page as bellow.


Then you can enter "inbound.queue" as Queue Name and then clieck Create button. after it successfully created queue you could be able to see the newly created ActiveMQ queue "inbound.queue" as show in bellow.


Test the functionality

We can test the functionality by sending new message in to "" queue as mentioned follows. First go to ActiveMQ web console(you need to provide login details) Then click on send To link inline with your created queue.

Click Send To link as show on figure 

Then past following structured xml in message box as show in below figure.


<Person>   <name>nirmal</name>   <city>Seatle</city>   <country>USA</country></Person>


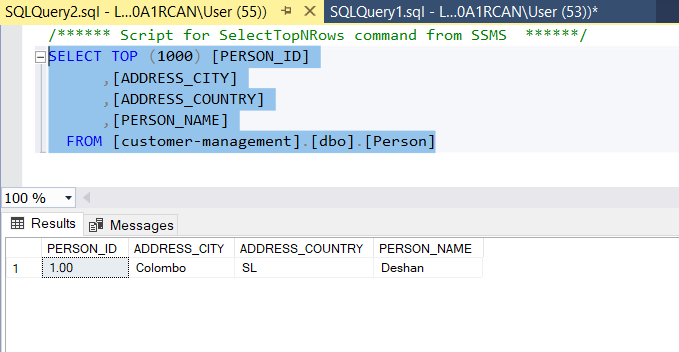
Then click on the send button. Now you can check the database and you should be able to see persist person data as show below.


Database Person table after executing above command


You can download the entire source code from following GIT hub URL. 


Sunday, January 26, 2020

CXF REST API with JPA Hibernate in Karaf on JBoss FUSE 7.4


In this post I will demonstrate how to configure CXF REST API in JPA implementation Hibernate on Karaf platform on JBoss fuse 7.4. I will use previous JPA project as code base to start the development. You can refer about it from my previous blog post.

Prerequisites 
  1. You should have install java 1.8 or above.
  2. You should have IDE installed in your PC in my case I'm using IntelliJ IDEA.
  3. Your PC should setup Maven installed and configured.
  4. Your  PC should install and setup SQLServer.
  5.  Checkout base project from JPA project as code base.


Application module Dependency 

First Lets add relevant dependencies in to Application POM file. Following is the full pom file content and updated part on bold font. Since we are using CXF REST we need to add relevant dependency for that.


<?xml version="1.0" encoding="UTF-8"?>
<project xmlns="http://maven.apache.org/POM/4.0.0"
         xmlns:xsi="http://www.w3.org/2001/XMLSchema-instance"
         xsi:schemaLocation="http://maven.apache.org/POM/4.0.0 http://maven.apache.org/xsd/maven-4.0.0.xsd">
    <parent>
        <artifactId>FuseHibernate</artifactId>
        <groupId>com.fuse.hibernate.example</groupId>
        <version>1.0-SNAPSHOT</version>
    </parent>
    <modelVersion>4.0.0</modelVersion>

    <artifactId>Application</artifactId>
    <name>OSGi Application</name>
    <packaging>bundle</packaging>
    <dependencies>
        <dependency>
            <groupId>com.fuse.hibernate.example</groupId>
            <artifactId>Service</artifactId>
            <version>1.0-SNAPSHOT</version>
            <scope>compile</scope>
        </dependency>
        <dependency>
            <groupId>org.apache.camel</groupId>
            <artifactId>camel-core</artifactId>
            <scope>provided</scope>
        </dependency>
        <dependency>
            <groupId>org.apache.karaf.shell</groupId>
            <artifactId>org.apache.karaf.shell.core</artifactId>
        </dependency>

        <!--        CXF related dependencies -->
        <dependency>
            <groupId>org.apache.cxf</groupId>
            <artifactId>cxf-rt-rs-client</artifactId>
            <version>3.0.4.redhat-621084</version>
        </dependency>
    </dependencies>
    <build>
        <plugins>
            <plugin>
                <groupId>org.apache.karaf.tooling</groupId>
                <artifactId>karaf-services-maven-plugin</artifactId>
            </plugin>
            <plugin>
                <groupId>org.apache.felix</groupId>
                <artifactId>maven-bundle-plugin</artifactId>
                <configuration>
                    <instructions>
                        <Private-Package>com.fuse.hibernate.example.app</Private-Package>
                        <Import-Package>com.fuse.hibernate.example.model,org.hibernate.jpa, org.apache.karaf.shell*;version="[4,5)", *</Import-Package>
                    </instructions>
                </configuration>
            </plugin>
        </plugins>
    </build>

</project>

Defining the REST API END POINT 

Then lets add our rest API end point. We just need add one class which we can define relevant methods we need to expose. For this example I will add GET,PUT,POST and DELETE methods in to our REST end point.
I will add "RestEndPoint " class in com.fuse.hibernate.example.app package with following content.


package com.fuse.hibernate.example.app;

import com.fuse.hibernate.example.model.Person;
import com.fuse.hibernate.example.service.PersonServiceImpl;
import org.apache.karaf.shell.api.action.lifecycle.Reference;
import org.apache.karaf.shell.api.action.lifecycle.Service;
import org.slf4j.Logger;
import org.slf4j.LoggerFactory;

import javax.ws.rs.*;
import javax.ws.rs.core.Response;
import java.math.BigInteger;

@Service
@Path("/personservice/")
public class RestEndPoint {

    @Reference
    private PersonServiceImpl personService;
    static Logger LOG = LoggerFactory.getLogger(ExchangeProcessor.class);

    @GET
    @Path("/persons/{id}/")
    @Produces("application/xml")
    public Person getPerson(@PathParam("id") String id) {
        LOG.info("----invoking getPerson, Person name is: " + id);
        Person c = personService.findPerson(BigInteger.valueOf(Long.valueOf(id)));
        return c;
    }

    @PUT
    @Path("/persons/")
    public Response updatePerson(Person person) {
        LOG.info("----invoking updatePerson, Person name is: " + person.getName());
        Person c = personService.findPerson(person.getId());
        Response r;
        if (c != null) {
            personService.updateCustomer(person);
            r = Response.ok().build();
        } else {
            r = Response.notModified().build();
        }

        return r;
    }

    @POST
    @Path("/persons/")
    public Response addPerson(Person person) {
        LOG.info("----invoking addPerson, Person name is: " + person.getName());

        Person saved=personService.createPerson(person);

        return Response.ok().type("application/xml").entity(saved).build();
    }

    @DELETE
    @Path("/persons/{id}/")
    @Produces("application/xml")
    public Response deletePerson(@PathParam("id") String id) {
        LOG.info("----invoking getPerson, Person name is: " + id);
        Person c = personService.findPerson(BigInteger.valueOf(Long.valueOf(id)));
        Response r;
        if (c != null) {
            personService.removePersonById(c.getId());
            r = Response.ok().build();
        } else {
            r = Response.notModified().build();
        }
        return r;
    }

    public PersonServiceImpl getPersonService() {
        return personService;
    }

    public void setPersonService(PersonServiceImpl personService) {
        this.personService = personService;
    }

}


Defining the REST END POINT in BluePrint  

Then lets add created rest endpoint class in to our BlurPrint.xml file in the Application module. We just need to modify following content which colored in bold.


<?xml version="1.0" encoding="UTF-8"?>
<blueprint xmlns="http://www.osgi.org/xmlns/blueprint/v1.0.0" xmlns:jpa="http://aries.apache.org/xmlns/jpa/v2.0.0" xmlns:tx="http://aries.apache.org/xmlns/transactions/v1.2.0"
           xmlns:xsi="http://www.w3.org/2001/XMLSchema-instance"
           xmlns:jaxrs="http://cxf.apache.org/blueprint/jaxrs"
           xsi:schemaLocation="http://www.osgi.org/xmlns/blueprint/v1.0.0 https://www.osgi.org/xmlns/blueprint/v1.0.0/blueprint.xsd
             http://camel.apache.org/schema/blueprint http://camel.apache.org/schema/blueprint/camel-blueprint.xsd
             http://cxf.apache.org/blueprint/jaxrs http://cxf.apache.org/schemas/blueprint/jaxrs.xsd">
  <jpa:enable />
  <tx:enable-annotations />
  <service ref="personService" interface="com.fuse.hibernate.example.service.PersonService" />
  <bean id="personService" class="com.fuse.hibernate.example.service.PersonServiceImpl" />
  <bean
          class="com.fuse.hibernate.example.app.ExchangeProcessor" id="exchangeProcessor">
    <property name="personService" ref="personService"/>
  </bean>

  <camelContext xmlns="http://camel.apache.org/schema/blueprint"
                id="cbr-example-context" >
    <route id="cbr-route" >
      <from uri="file:work/cbr/input" />
      <log message="Sending order ${file:name} to another country" />
      <log id="logStatusIncident" message="OrderDetails Call ${body}"/>
      <to uri="file:work/cbr/output/others" />
      <convertBodyTo type="java.lang.String"/>
      <process ref="exchangeProcessor"/>
      <log  message="${body}" />

    </route>
  </camelContext>

  <jaxrs:server id="personsService" address="/crm">
    <jaxrs:serviceBeans>
      <ref component-id="personSvc"/>
    </jaxrs:serviceBeans>
  </jaxrs:server>

  <bean id="personSvc" class="com.fuse.hibernate.example.app.RestEndPoint">
    <property name="personService" ref="personService"/>
  </bean>
</blueprint>

Now its ready to deploy application in to FUSE server.

Installing in to FUSE 7.4

We can use same set of commands except one new dependency addition code. In order to add dependencies first we have to run the fuse.bat file and then go to the console and enter following commands one by one. Only the third command new from previous post.


osgi:install -s mvn:com.microsoft.sqlserver/mssql-jdbc/7.4.1.jre8

osgi:install -s mvn:org.ops4j.pax.jdbc/pax-jdbc-mssql/1.3.5

osgi:install -s mvn:org.apache.cxf/cxf-rt-rs-client/3.0.4.redhat-621084


Then lets install application by entering following commands one by one


feature:repo-add mvn:com.fuse.hibernate.example/Feature/1.0-SNAPSHOT/xml


feature:install osgi-customer-management-datasource

feature:install Model

feature:install Service

feature:install Application


Then after "list" command you should be able to see all the things we installed. Similar to below figure.

After Successful installation LIST command should return something similar to this.

You can verify by accessing http://localhost:8181/cxf/ link you should be able to see following UI in browser.

http://localhost:8181/cxf/ output once successfully installed the Application 

Now you can click the WADL link and see the defined endpoints in there.

WADL output for defined REST service.


Test the functionality

We can test the functionality by executing following commands in command prompt.


To Create new person

curl -X POST -T C:/Users/Person3.xml -H "Content-Type: text/xml" http://localhost:8181/cxf/crm/personservice/persons

You should get similar result as below figure and you can see Person table which inserted new value.
Command Line output of POST command

Database Person table after executing above command


To Get existing person

curl -X GET http://localhost:8181/cxf/crm/personservice/persons/1

Output of GET command


To Update existing person

curl -X PUT -T C:/Users/Person4.xml -H "Content-Type: text/xml" http://localhost:8181/cxf/crm/personservice/persons

For this command you will not get any visible output but then if you run previous GET command you could see the Person details has been updated. As show on below figure.

Updated user details

To Delete existing person

curl -X DELETE http://localhost:8181/cxf/crm/personservice/persons/1

For this command also you will not get any visible output on Command Line but after this if you run GET command then you could see you will not get any data. As show on below figure. Also you can check on database and see that Person already deleted from the database.

Deletion command output on Command Line


You can download the entire source code from following GIT hub URL.