As a developer it's really need to have understand on version controlling when work with project which contributed more developers development knowledge. In this post I will explain how to set up visual SVN server (https://www.visualsvn.com/) on local machine.
Prerequisites
- You should have install java in your PC and set path variable correctly (JAVA_HOME, JRE_HOME)
- You should have install Eclipse Java EE IDE in your PC
Step 1 Download and install virtual SVN server
First we have to download the visual SVN server (Version 3.3.1) from following location https://www.visualsvn.com/server/download/ select the correct bit version (Figure 1) and download the software.
 |
| Figure 1: Download appropriate version |
Double click the downloaded file and install the server in to local machine. You can see interface similar to Figure 2.
 |
| Figure 2: Welcome screen of visual SVN server setup |
Then click next, accept the terms and conditions then click next then you can see interface similar to Figure 3. Select visual SVN server and management console and make sure to check Add subversion command line tool to PATH environment variable then click next.
 |
| Figure 3: Select visualSVN server and management console |
Then click on Standard edition (Figure 4)
 |
| Figure 4: Select standers edition |
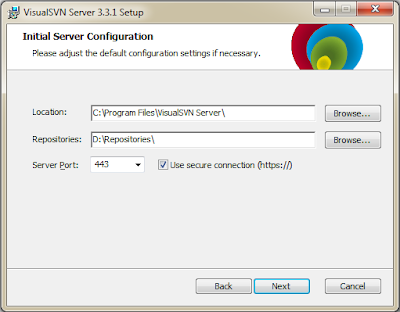
In next interface you have to provide installation directory for visualSVN server , the repository folder location and port to run visualSVN server. Figure 5
 |
| Figure 5: Provide basic details to install visualSVN |
Then click next and from the next interface click on install button. After completion of installation you can see similar interface to Figure 6. Then Click finish.
 |
| Figure 6: Installation complete screen |
Step 2 Configure visual SVN server
First run visualSVN program that you have installed in previous step. Then Right click on Repository and click on Create New Repository as show in Figure 7.
 |
| Figure 7: Select Create New Repository |
On the pop up interface provide valid name for the repository you are going to create. (Figure 8) Then click new and on next interface select Single project repository and click Next.(Figure 9)
 |
| Figure 8: Provide valid name for repository |
 |
| Figure 9: Select Singer Project Repository |
On next interface select All subversion users have Read/Write access(Figure 10)then click on create.
 |
| Figure 10: Select All subversion user have Read/Write access option and click create |
After successful installation you can see interface similar to Figure 11. In that interface you can see the repository URL witch use to access the repository.
 |
| Figure 11: Successfully created repository |
Then click finish and now you can see your newly created repository under Repositories on visualSVN server. Then go in to your repository and expand it. Then right click on Trunk then select New->Folder and provide a folder name for a project that you going to setup in your repository.
 |
| Figure 12: Click on New-> Folder |
Then lets create new user for newly created repository for that right click on Users and Click create user. On the interface provide user name and password. (Figure 13)
 |
| Figure 13: Create user by providing user name and password |
Step 3 Comit project into newly created SVN repository
Lets add new project in to newly created SVN repository. First lets create sample project on Eclipse (Any kind of project). Then we have to add SVN repository path in to Eclipse. Go to Window->Open perspective->Other
 |
| Figure 14: Select other on Open perspective |
Select SVN repository Exploring and select Ok. Figure 15
 |
| Figure 15: Select SVN repository Exploring |
Then right click on repository perspective and select New->Repository Location Then you can see similar interface to Figure 16. In that provide the repository URL that we have crated in second step.(https://Nadeesha-PC/svn/it.con.testSVN/) Then provide user credentials that you have created on creating user on visualSVN server then click finish
 |
| Figure 16: Provide repository details and Finish |
Now we have added the repository URL in to eclipse and now we can add projects in to that repository. Now right click on the project that we created in previous step and select Team->Share Project then select the select SVN and select next. On next interface select existing repository location and click Finish. Now we have successfully added a project in to our repository.
In project perspective you can see SVN path at the end of project name as show in figure 17.
 |
| Figure 17: Successfully added a project |
In visualSVN server also show the newly added project in to repository as show in Figure 18.
 |
| Figure 18: Newly added project in visualSVN server |
We have successfully added a project in to visualSVN server. :)
No comments:
Post a Comment