Friday, November 11, 2016

Create simple Web service using CXF and deploy to FUSE

In this post I'm going to show how to develop CXF web service and step by step guide to deploy it to the JBoss FUSE server. While I'm learning the stuff it gave me little bit frustration due to the lack of resources to learn this technology as a beginner. Then I though to put it as blog post so in future any one can refer the guide line.

Prerequisites 
  1. You should have install java 1.8 to support latest jboss-fuse-6.3.0
  2. You should have install JBoss Developer studio
  3. Your PC should setup Maven installed and configured.


01) Lets create the FUSE CXF project

First open the JBoss Developer Studio and go to File-> New -> Fuse Integration Project. Then provide the project name.


Figure 1: Provide the project name


Then select the run time environment of the Fuse server then click next. This should be setup in your JBoss Developer studio. If not you have to setup new run time environment by click on new button.
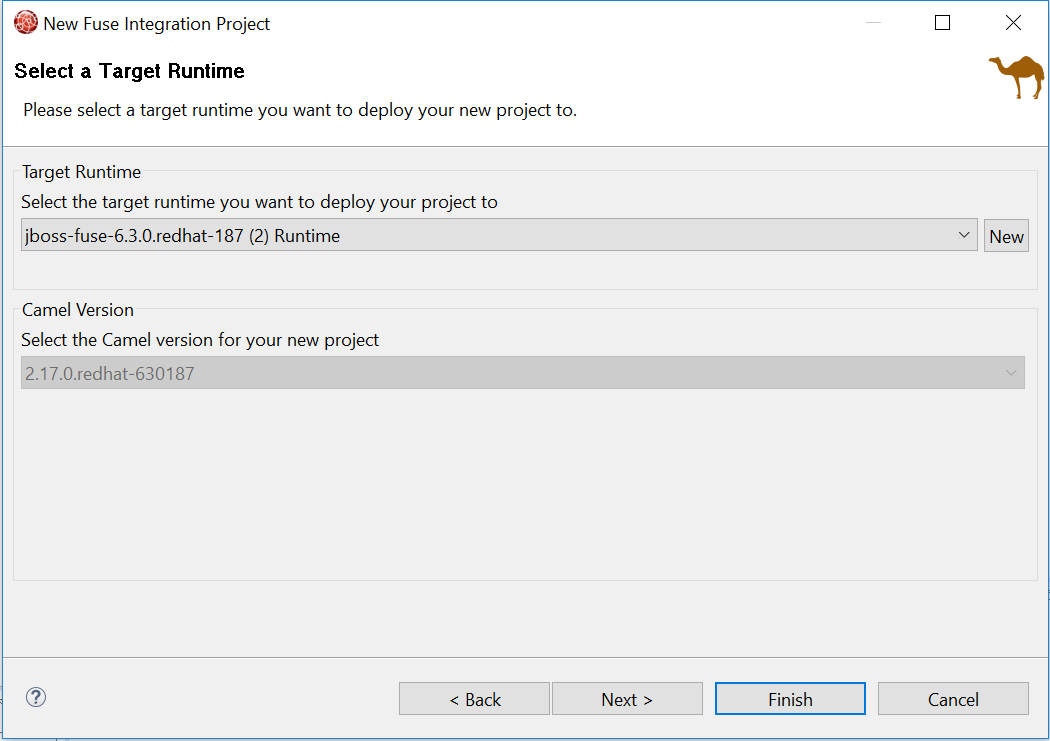
Figure 2: Select the run time environment

On next interface you have to select "Start with an empty project" and "Spring DSL" as show on below figure.

Figure 3: Select "Start with empty project" and "Spring DSL" as project type
Then click finish and it will take some time to create the project in Development studio. Please note that some times IDE get unresponsive as well. Then you will be able to see similar interface to below figure.

Figure 4: New project interface

Then right click on the "main" folder under src folder and then go to new->Folder, set folder name as "java". Then right click on the java folder and then go to new->Interface. Then provide the name for the service in my demo I'll give as "DemoOrderService" and package as "com.demo.order" then click finish. (show in below figure)

Figure 5: Interface for the service

Then again add two classes in to "java" folder as "Input" and "Output" as show on below figure.

Figure 5: Add DemoOrderSerice interface and Input and Output classes

Then add following content in to Input class.

package com.demo.order;

public class Input {
private String fName;
private String lName;
private String age;
private String country;
public String getfName() {
return fName;
}
public void setfName(String fName) {
this.fName = fName;
}
public String getlName() {
return lName;
}
public void setlName(String lName) {
this.lName = lName;
}
public String getAge() {
return age;
}
public void setAge(String age) {
this.age = age;
}
public String getCountry() {
return country;
}
public void setCountry(String country) {
this.country = country;
}
}


Add following content in to Output class.


package com.demo.order;

public class Output {
private String name;
private String status;
public String getName() {
return name;
}
public void setName(String name) {
this.name = name;
}
public String getStatus() {
return status;
}
public void setStatus(String status) {
this.status = status;
}
}


And add following content in to the DemoOrderService interface.

package com.demo.order;

public interface DemoOrderService {
Output provideOrder(Input input);
}


Then double click on the "camel-context.xml" file in the "src\main\resources\META-INF\spring\" directory. Then click on the source section as show in below figure.

Figure 6: Click on the source section as show in above

Then update the beans declaration as below. I have added bold section in to the bean definition.

<beans xmlns="http://www.springframework.org/schema/beans"
    xmlns:cxf="http://camel.apache.org/schema/cxf"
    xmlns:xsi="http://www.w3.org/2001/XMLSchema-instance" 
    xsi:schemaLocation="http://www.springframework.org/schema/beans 
    http://www.springframework.org/schema/beans/spring-beans.xsd        
    http://camel.apache.org/schema/spring http://camel.apache.org/schema/spring/camel-spring.xsd        
    http://camel.apache.org/schema/cxf http://camel.apache.org/schema/cxf/camel-cxf.xsd    ">

Then add following section just after the beans definition,to define the web service in our application.

<cxf:cxfEndpoint address="http://localhost:9292/cxf/order"
        id="demoOrderEndpoint" serviceClass="com.demo.order.DemoOrderService"/>

Then inside the camel-context delete the existing content and add following content

        <route id="cxf">
            <!-- route starts from the cxf webservice in POJO mode -->
            <from id="demoOrderEndpointListener" uri="cxf:bean:demoOrderEndpoint"/>
            <recipientList id="dispatchToCorrectRoute">
                <simple>direct:${header.operationName}</simple>
            </recipientList>
        </route>


Then add the following route details after that. In here direct:provideOrder refer to the provideOrder method in the service interface.


        <route id="Order">
            <from id="statusIncidentStarter" uri="direct:provideOrder"/>
            <log id="logStatusIncident" message="OrderDetails Call"/>
        </route>

Then right click on the java folder and add new class call "OrderProcessor" add following content in to that class. Note that this class should be extend org.apache.camel.Processor class and should override the process method.

package com.demo.order;

import org.apache.camel.Exchange;
import org.apache.camel.Processor;

public class OrderProcessor  implements Processor {

@Override
public void process(Exchange exchange) throws Exception {
Input input = exchange.getIn().getBody(Input.class);
Output output=new Output();
output.setName(input.getfName()+" "+input.getlName());
output.setStatus("OK");
exchange.getOut().setBody(output);
}

}


Then add this bean in to camel-context.xml before the beans declaration.

    <bean
        class="com.demo.order.OrderProcessor" id="orderProcessor"/>

Then update the Order route as below in there we refer the bean which we defined on above step by id on the bean definition.

        <route id="Order">
            <from id="statusIncidentStarter" uri="direct:provideOrder"/>
            <log id="logStatusIncident" message="OrderDetails Call"/>
            <process ref="orderProcessor"/>
        </route>

Whole camel context.xml will have following content.

<?xml version="1.0" encoding="UTF-8"?>

<!-- Configures the Camel Context-->
<beans xmlns="http://www.springframework.org/schema/beans"
    xmlns:cxf="http://camel.apache.org/schema/cxf"
    xmlns:xsi="http://www.w3.org/2001/XMLSchema-instance" 
    xsi:schemaLocation="http://www.springframework.org/schema/beans 
    http://www.springframework.org/schema/beans/spring-beans.xsd        
    http://camel.apache.org/schema/spring http://camel.apache.org/schema/spring/camel-spring.xsd        
    http://camel.apache.org/schema/cxf http://camel.apache.org/schema/cxf/camel-cxf.xsd    ">
    
    <cxf:cxfEndpoint address="http://localhost:9292/cxf/order"
        id="demoOrderEndpoint" serviceClass="com.demo.order.DemoOrderService"/>
    <bean
        class="com.demo.order.OrderProcessor" id="orderProcessor"/>
        
    <camelContext id="_camelContext1" xmlns="http://camel.apache.org/schema/spring">
        <route id="cxf">
            <!-- route starts from the cxf webservice in POJO mode -->
            <from id="demoOrderEndpointListener" uri="cxf:bean:demoOrderEndpoint"/>
            <recipientList id="dispatchToCorrectRoute">
                <simple>direct:${header.operationName}</simple>
            </recipientList>
        </route>
        <route id="Order">
            <from id="statusIncidentStarter" uri="direct:provideOrder"/>
            <log id="logStatusIncident" message="OrderDetails Call"/>
            <process ref="orderProcessor"/>
        </route>
    </camelContext>
</beans>


Now we have completed the development of our Demo service lets build our application and deploy it in to the Fuse server.

Then go to the project root directory using command line and then enter following command.

mvn clean install

Then you will see the build success message and then open the FUSE console by double click on the  fuse.bat file. Then install our application in fuse server by type and enter following command. 

osgi:install -s mvn:com.mycompany/camel-spring/1.0.0-SNAPSHOT

Then go to the http://localhost:8181/cxf/ URL then you will be able to see similar interface to below figure. (http://localhost:9292/cxf/order?wsdl this will be the our service wsdl according to the configurations) 


Then lets test our web service on SOAP UI. Open the SOAP UI interface and go to New -> New SOAP Project. Provide a name for the project and provide wsdl as http://localhost:9292/cxf/order?wsdl. (Please refer below figure)

Figure 8: New SOAP project

Then double click on the request node on left panel under the
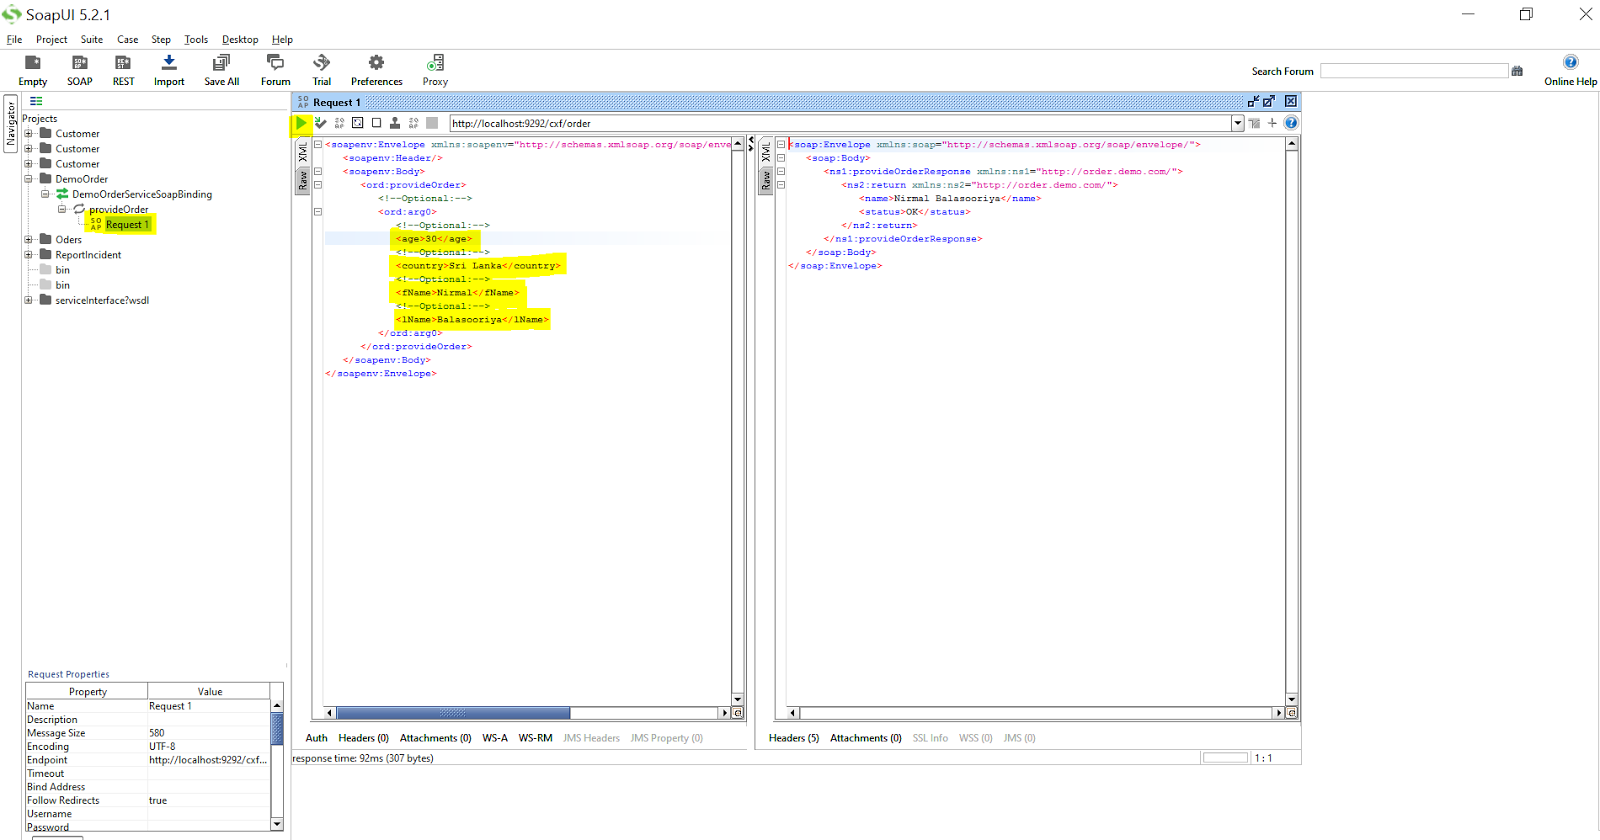
Figure 8: SOAP UI project request and response.

You can access the code from following link on GIT repository.

Tuesday, November 1, 2016

Red Hat JBoss FUSE installation step by step

In this post I'll explain how to setup the JBoss FUSE in local machine.

Prerequisites 
  1. You should have install java 1.8 to support latest jboss-fuse-6.3.0

First of all we need to doenload the jboss-fuse-6.3.0 from official Red Hat site. To download this you needed to register on Red Hat web site. Then you will be able to download it in to your computer as zip file.

FUSE official download page
Then after you download the zip file you can extract that zip file in to desired location (To extract you may need to have required software like 7zip or WinRAR etc ). After you extract you will see similar to following screen shot.

Extracted zip content

You can create users by changing the config file or you can create users in command line as well. I'll show both ways here.

i) Creating users using users.properties file

First of all if you are change the credentials in config file then you need to open etc/users.properties file. Then add details in following format.

USER=PASSWORD,ROLE1

So let say you are creating user call adminfuse with password adminfuse and role admin, then you need to add following line in to that configuration file.

adminfuse=adminfuse,admin

After add user details in to users.properties file

Then you can start Fuse by double click on bin/fuse.bat file(in Bin directory ). After successful start you can see similar interface to below figure.

Successful loaded Fuse interface

Then you can go to the http://localhost:8181/ URL to access the fuse web interface. Then provide the user name and password provided in the users.properties file and log in to the system. Then you will be able to see similar interface to below figure.

Success login page

ii) Creating users console 

I'll now describe how to create the users in console. On that we do not need to change any configuration just needed to double click on bin/fuse.bat file(in Bin directory ). Then after successful start you need to give following command to create new users.

esb:create-admin-user

type this in console and enter then you will be able to see interface as show in below. In there provide admin name and system ask you to enter the password. Then again you may need to enter the password for verification. Now you have created the admin user.

Set admin username and password interface
  

Then you can go to the http://localhost:8181/ URL to access the fuse web interface. Then provide the user name and password provided.

So we have setup the JBoss Fuse in our machine.  In future I'll explain how to run simple example on JBoss fuse. 


Friday, July 8, 2016

AFTER Delete trigger sample in Oracle

In this post I'll describe create after delete trigger and access the deleted row data from the trigger.

Prerequisites 
  1. You should have install Oracle database installed in your PC.
  2. I'm using Oracle SQL developer to execute SQL queries.

Step 1 Lets create two sample tables

I'll create student and subjects table to demonstrate this After Delete trigger.
create student table using following SQL.

create table student
(
studentid number,
firstName varchar2(20) not null,
lastName varchar2(20) not null,
age number(2),
primary key(studentid)
);

Add sample data in to student table.

insert into student values(1,'Lakshan','Silva',21);
insert into student values(2,'Kuma','Sangakara',35);
insert into student values(3,'Nilakshi','Dissanayaka',29);
insert into student values(4,'Laksh','Perera',29);

After inserting above data student table will be similar to below.


Then lets create subjects table and add some sample data.

create table subjects(
  subjectID int,
  subjectName varchar(200),
  studentId number,
  primary key(subjectID) );
  
  insert into subjects values(1,'Phys',2);
  insert into subjects values(2,'Bio',2);
  insert into subjects values(3,'Chemi',3);
  insert into subjects values(4,'Phys',1);
  insert into subjects values(5,'Bio',4);
  insert into subjects values(6,'Chemi',1);

  
Here Subjects table will have details about subjects assigned to each student. 

Step 2 Lets create the trigger

Lets create the trigger which delete related subjects when we delete a particular student in student table. By executing following SQL we can create the trigger.

create or replace trigger deleteTrigger
after delete on student
for each row
declare stdname varchar(100);
begin
  dbms_output.put_line('Name :: '|| :old.studentid);
  delete subjects where studentId=:old.studentid;
end;


Step 3 Lets delete student and check 

Then lets delete student with student id 2 and then check the content of the subjects table. To delete student lets use following sql.

delete from student where studentid=2;

Then our subjects table will be similar to below.


You can see that subjects related to student with studentid 2 has deleted from the trigger.

Due to this kind of triggers may provide many advantages such as it reduces the interactions between application and the database since trigger will be automatically calls when triggering event(In here after delete ) happens.


Thursday, February 4, 2016

Java Persistance API (JPA) Hello world example with EclipseLink and Oracle

Java Persistance API (JPA) provides the interface for the java Object Relational Mapping (ORM) tools such as EclipseLink, OpenJPA, Hibernate etc. These ORM tools helps to change the application data bases without doing any code level changers on Aplication logics. In other words ORM tools reduce the coupling between application layer and database layer.

On this post I will describe step by step aproche to develop simple Java application using EclipseLink ORM tool. In another post I will explain how to do the same operation with Hibernate.

Prerequisites 
  1. You should have install java in your PC and set path variable correctly (JAVA_HOME, JRE_HOME)
  2. You should have install Eclipse Java EE LUNA 4.4 IDE or any IDE you preferred (In this post I'm Using Eclipse )
  3. You should have install Oracle on your PC. In my application I connect to the Oracle 11g database and based on that database vertion you may need to select proper databse connection driver.

Step 1 Lets create database table for our simple application
 First of all we have to have table with set of data. I will create student table using following sql.

create table student
(
studentid number,
firstName varchar2(20) not null,
lastName varchar2(20) not null,
age number(2),
primary key(studentid)
);


As you can see student will have studentid as primary key and firstName, lastName, age as other attributes.

Then I'll add some data in to this table using following SQL.

insert into student values(1,'Lakshan','Silva',21);
insert into student values(2,'Kuma','Sangakara',35);
insert into student values(3,'Nilakshi','Dissanayaka',29);


Then after retrive all the student details using "select * from student" SQL you may able to see similar result to below graph.


Our table is ready at the moment so lets move to next step.

Step 2 Lets Create Dynamic web project

First of all lets download the required jar files to this project. You should download the following jar files
1) javax.persistence-2.1.0-rc1.jar (http://mvnrepository.com/artifact/org.eclipse.persistence/javax.persistence/2.1.0-RC1)
2) ojdbc6.jar (Since I have using Oracle 11g I downloaded it from http://www.oracle.com/technetwork/apps-tech/jdbc-112010-090769.html)
 
 Go to File->New->Other select JPA project as show in below image.


Then click on Next and provide project name I use HelloworldJPA as my project name. Then select target runtime as installed JDK(In my case it's jdk1.7.0_17). Then select JPA version as 2.1 and click next.
At the end interface should be similar to below graph.


Then click next on interface ask you to select src folder( since we use default folder no need to do any modification). The you can see similar interface to below screen shot.


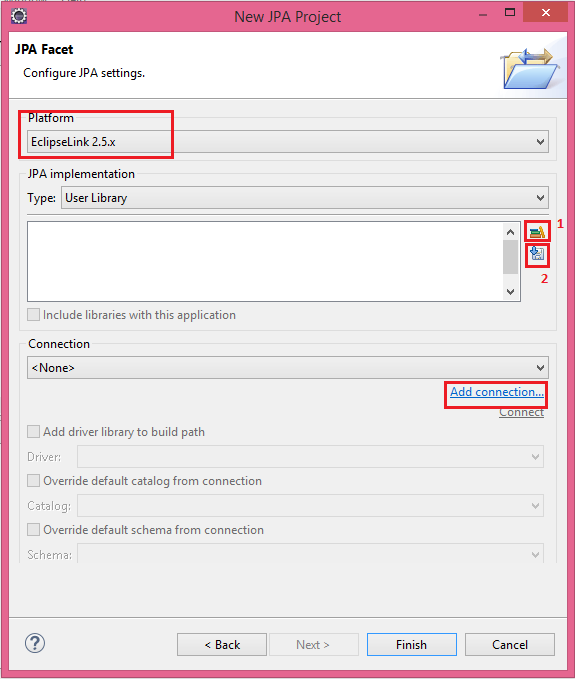
In this interface select platform as EclipseLink Then click on Manage User Libraries icon which show as No 1 red box in above image. Then click on new add user library name I use Javax.Persistence and then click Ok. The click on Add external Jars button and select the downloaded javax.persistence-2.1.0-rc1.jar then click OK.
Then lets add EclipseLink related jar files in to our project. To add that click on Download Library button(show on No 2 red box in above image). Then select the compatible EclipseLink library vertion and Click next. Then agree the agreement and download the relevant ExlipseLink jars in to project

Then lets add our database details for that click on Add connection then select connection profile type as Oracle and provide proper name for the connection I'm use "New Connection" 
Then provide details about database connection and click finish. (I have used oracle thin driver)
Then final image would be similar to below image.


 Then you may able to see project structure similar to below image.

Then double click on persistance.xml file and then go to connection tab. Select Transaction Type as Resource local. Then Click on Popular From Connection and select the database details which added on previous section. Then save the persistance.xml

Then we have to add databse drivers in to class path. Since in this example i'm using Oracle 11g I need to add ojdbc6.jar in to Build path. Right click on project and go to Build path -> Configure Build Path. Then click on Add External JARs and select the downloaded ojdbc6.jar. After adding database connecting driver in to project Java Build Path interface would be similar to below image. Then click Ok.


Step 3 Lets Create Entity class

In Object relational mapping process object table mapping done through the Entity class. On this mapping class we use different JPA anotations to spesify diferent kind of relationships on database tables.
Lets create new java class by right click on src folder and go to New-> class. then provide prefered class name with package name. I use class name as Student and package as "com.jpa.entity".

package com.jpa.entity;

import javax.persistence.Column;
import javax.persistence.Entity;
import javax.persistence.GeneratedValue;
import javax.persistence.GenerationType;
import javax.persistence.Id;
import javax.persistence.Table;

@Entity(name="Student")
@Table(name="Student")
public class Student {
    @Id
    @GeneratedValue(strategy=GenerationType.IDENTITY)

    @Column(name="studentid")
    int ID;
    @Column(name="firstName")
    String FirstName;
    @Column(name="lastName")
    String LastName;
    @Column(name="age")
    int Age;
   
    public int getID() {
        return ID;
    }
    public void setID(int iD) {
        ID = iD;
    }
    public String getFirstName() {
        return FirstName;
    }
    public void setFirstName(String firstName) {
        FirstName = firstName;
    }
    public String getLastName() {
        return LastName;
    }
    public void setLastName(String lastName) {
        LastName = lastName;
    }
    public int getAge() {
        return Age;
    }
    public void setAge(int age) {
        Age = age;
    }
   
    @Override
    public String toString() {
        return "Student [ID=" + ID + ", FirstName=" + FirstName + ", LastName="
                + LastName + ", Age=" + Age + "]";
    }
   
}


Then we have to spesify that we use EclipseLink as ORM tool and we use Student as entity class in persistance.xml. Final persistence.xml would similar to this.

<?xml version="1.0" encoding="UTF-8"?>
<persistence version="2.1" xmlns="http://xmlns.jcp.org/xml/ns/persistence" xmlns:xsi="http://www.w3.org/2001/XMLSchema-instance" xsi:schemaLocation="http://xmlns.jcp.org/xml/ns/persistence http://xmlns.jcp.org/xml/ns/persistence/persistence_2_1.xsd">
    <persistence-unit name="HellowWorldJPA" transaction-type="RESOURCE_LOCAL">
    <provider>org.eclipse.persistence.jpa.PersistenceProvider</provider>
    <class>com.jpa.entity.Student</class>

        <properties>
            <property name="javax.persistence.jdbc.url" value="jdbc:oracle:thin:@localhost:1521:xe"/>
            <property name="javax.persistence.jdbc.user" value="DBUserName"/>
            <property name="javax.persistence.jdbc.password" value="DBPassword"/>
            <property name="javax.persistence.jdbc.driver" value="oracle.jdbc.OracleDriver"/>
        </properties>
    </persistence-unit>
</persistence>


Step 4 Lets Create class to save details in to database using ORM tool
   
Right click on src folder and go to New-> class. Then provide prefered class name with package name. I use class name as MainApp and package as "com.jpa.mainApp". Then add following content in to that class.

package com.jpa.mainApp;

import javax.persistence.EntityManager;
import javax.persistence.EntityManagerFactory;
import javax.persistence.Persistence;

import com.jpa.entity.Student;

public class MainApp {
    public static void main(String[] args) {
       
        EntityManagerFactory emf=Persistence.createEntityManagerFactory("HellowWorldJPA");
        //"HellowWorldJPA" is the persistence unit name which we spesify in persistence.xml
        EntityManager em=emf.createEntityManager();
       
        em.getTransaction().begin();
       
        Student std=new Student();
        std.setID(4);
        std.setFirstName("Nilanka");
        std.setLastName("Subhash");
        std.setAge(35);
       
        em.persist(std);
        em.getTransaction().commit();
       
        em.close();
        emf.close();
    }
}


 Then lets run the class by right click on the class and go to Run As -> Java Application.
Then you should able to see similar log in colsole related to your project name and path details.

[EL Info]: 2016-02-04 17:56:10.874--ServerSession(1528705718)--EclipseLink, version: Eclipse Persistence Services - 2.5.2.v20140319-9ad6abd
[EL Info]: connection: 2016-02-04 17:56:12.674--ServerSession(1528705718)--file:/G:/Programming/LUNA_WK_SPACES/JPA_SAMPLE/HellowWorldJPA/build/classes/_HellowWorldJPA login successful
[EL Info]: connection: 2016-02-04 17:56:13.19--ServerSession(1528705718)--file:/G:/Programming/LUNA_WK_SPACES/JPA_SAMPLE/HellowWorldJPA/build/classes/_HellowWorldJPA logout successful


Then if you query student table you can see folowing output.


I will provide more advance features using Java Persistence API in my future posts. You can download the source code from following GIT location https://github.com/NirmalBalasooriya/HelloWorldJPA.