Friday, December 7, 2018

Setup React.js with sprint boot

In this post I'm going to setup Reactjs project and integrate it with SpringBoot project.

Prerequisites 
  1. You should have install java 1.8 or above.
  2. You should have Eclipse installed in your PC.
  3. Your PC should setup Maven installed and configured.

First of all lets create maven project by click on File-> New -> Maven Project then provide project details (I select create simple project). My project details as follows.


Lets add required dependencies in to the pom file first. I will use the similar pom structure with my inital spring boot project setup.


<project xmlns="http://maven.apache.org/POM/4.0.0" xmlns:xsi="http://www.w3.org/2001/XMLSchema-instance" xsi:schemaLocation="http://maven.apache.org/POM/4.0.0 http://maven.apache.org/xsd/maven-4.0.0.xsd">

  <modelVersion>4.0.0</modelVersion>

  <groupId>com.nirmal.blog</groupId>

  <artifactId>ReacjsApp</artifactId>
  <version>0.0.1-SNAPSHOT</version>
  <packaging>war</packaging>

<parent>
        <groupId>org.springframework.boot</groupId>
        <artifactId>spring-boot-starter-parent</artifactId>
        <version>2.0.5.RELEASE</version>
    </parent>

 <dependencies>

  <!-- Compile -->
  <dependency>
   <groupId>org.springframework.boot</groupId>
   <artifactId>spring-boot-starter-web</artifactId>
  </dependency>

  <dependency>
   <groupId>javax.servlet</groupId>
   <artifactId>jstl</artifactId>
  </dependency>

  <!-- Provided -->
  <dependency>
   <groupId>org.apache.tomcat.embed</groupId>
   <artifactId>tomcat-embed-jasper</artifactId>
   <scope>provided</scope>
  </dependency>

  <!-- Runtime -->
  <dependency>
   <groupId>mysql</groupId>
   <artifactId>mysql-connector-java</artifactId>
   <version>5.1.6</version>
  </dependency>

 </dependencies>
 <build>

  <plugins>
   <plugin>
    <groupId>org.springframework.boot</groupId>
    <artifactId>spring-boot-maven-plugin</artifactId>
   </plugin>
  </plugins>
 </build>  
</project>


But still project will not be able to perform maven install since we have not added springboot initialization class with main method.
Lets add that class with main method in to our project I'll call it as MyApp class. It will contain following details.

package com.nirmal.blog;

import org.springframework.boot.SpringApplication;
import org.springframework.boot.autoconfigure.SpringBootApplication;
import org.springframework.boot.builder.SpringApplicationBuilder;
import org.springframework.boot.web.servlet.support.SpringBootServletInitializer;

@SpringBootApplication
public class MyApp extends SpringBootServletInitializer {

@Override
protected SpringApplicationBuilder configure(SpringApplicationBuilder application) {
return application.sources(MyApp.class);
}

public static void main(String[] args) {
SpringApplication.run(MyApp.class, args);
}

}


After our springboot initialization class lets add the spring boot configuration file "application.properties". it should be added it to resource folder.

spring.mvc.view.prefix: /.
spring.mvc.view.suffix: .html


Then lets start develop the Reacjs part of the project. First of all you need to install node in your local machine. You can download nodejs from following location. In my application I'm using node version node-v8.11.3-x64. Install it in your local machine.

Then I  created new folder call "reactjs" and then use following command to create new reactjs project inside our maven project structure.

npx create-react-app my-app

after successful installation you should be able to see similar output to following


Then you can go inside the my-app folder and enter following command

npm run-script build

This will build the web application for us on the build folder in our reactjs project as show in bellow. 


Then lets start reactjs app by entering following command

nmp start

Then your newly created project should started and you should able to see similar output on your browser.


So far our project structure should be similar to bellow image.


First of all lets set the our application context path. Here we have to set context path in two places. One is for ReactJs and other one is for spring boot.

To set context path on ReactJs we have to modify homepage variable in package.json file.

In my example I set as bellow. you can access whole package json on github location.

"homepage": "http://localhost:8080/ReacjsApp/"


Then lets set the context path on Spring boot application we just need to add that configuration in to application.properties file. For my application configuration would be similar to bellow. 

server.servlet.context-path=/ReacjsApp

Then we have to add following configuration to specify the location for static resources which required for the reactjs app to start.

spring.resources.static-locations=classpath:/

Whole pplication.properties file can be access on github location.

Then lets modify this default application application to perform the react installation and build when project perform the maven install. In order to do that we have to add following command in the pom file.

 <build>
  <plugins>

   <plugin>
    <groupId>org.springframework.boot</groupId>
    <artifactId>spring-boot-maven-plugin</artifactId>
    </plugin>
    <plugin>
<groupId>com.github.eirslett</groupId>
<artifactId>frontend-maven-plugin</artifactId>
<version>1.6</version>
        <configuration>
            <workingDirectory>src/main/reactjs/my-app</workingDirectory>
<installDirectory>target</installDirectory>
</configuration>
<executions>
<execution>
<id>install node and npm</id>
<goals>
<goal>install-node-and-npm</goal>
</goals>
<configuration>
<nodeVersion>v10.11.0</nodeVersion>
<npmVersion>6.4.1</npmVersion>
</configuration>
</execution>
<execution>
<id>npm install</id>
<goals>
<goal>npm</goal>
</goals>
<configuration>
<arguments>install</arguments>
</configuration>
</execution>
<execution>
<id>npm run</id>
<goals>
<goal>npm</goal>
</goals>
<configuration>
<arguments>run-script build</arguments>
</configuration>
</execution>
</executions>
   </plugin>
   <plugin>
        <artifactId>maven-resources-plugin</artifactId>
        <version>2.6</version>
        <executions>
          <execution>
            <id>copy-resources</id>            
            <phase>validate</phase>
            <goals>
              <goal>copy-resources</goal>
            </goals>
            <configuration>
              <outputDirectory>${basedir}/src/main/webapp</outputDirectory>
              <resources>          
                <resource>
                  <directory>src/main/reactjs/my-app/build</directory>
                  <filtering>true</filtering>
                </resource>
              </resources>              
            </configuration>            
          </execution>
        </executions>
      </plugin>   
  </plugins>


 </build> 

Now we are ready to install our application using maven. When performing the maven install you can see its executes the npm install and npm run-script build as show in bellow.


After successful maven installation you can see the war file generated on the target folder and you can run the we application using following command without any servlet container.

java -jar ReacjsApp-0.0.1-SNAPSHOT.war

Then you will be able to see spring application starting run and after its completed you will be able to access first reactjs app on SpringBoot on following http://localhost:8080/ReacjsApp/.


Project source can be access on following github location.

Sunday, November 11, 2018

Different Spring Bean Autowire mechanisms

In this post I'm going to demonstrate different ways of Bean Autowire mechanisms. In Spring framework it provided mainly  5 ways.


  • constructor : Spring container will look in to Constructor based autowire. 
  • byName : Spring container will look in to bean name matching.
  • byType : Spring container will look in to bean class type matching
  • No (by reference) : Spring container will look in to bean reference explicitly.
  • default-autowire : Spring container will look in to default-autowire type define in Beans tag on Spring configuration.

Lets create small demonstration application to get understand about each and every Autowire type.

Lets create simple maven project I'll provide GrouupId as "com.sample.spring" and artifactID as "SpringAutowireSamples". Then click on finish. 


Then lets add our spring dependencies in to our pom file by updating pom file as bellow.


<project xmlns="http://maven.apache.org/POM/4.0.0" xmlns:xsi="http://www.w3.org/2001/XMLSchema-instance" xsi:schemaLocation="http://maven.apache.org/POM/4.0.0 http://maven.apache.org/xsd/maven-4.0.0.xsd">
  <modelVersion>4.0.0</modelVersion>
  <groupId>com.sample.spring</groupId>
  <artifactId>SpringAutowireSamples</artifactId>
  <version>0.0.1-SNAPSHOT</version>

<properties>
<spring_version>5.1.2.RELEASE</spring_version>
</properties>    
  <dependencies>
<dependency>
<groupId>org.springframework</groupId>
<artifactId>spring-core</artifactId>
<version>${spring_version}</version>
</dependency>
<dependency>
<groupId>org.springframework</groupId>
<artifactId>spring-context</artifactId>
<version>${spring_version}</version>
</dependency>
</dependencies>
 
</project>


Then lets create our bean classes as bellow.
Address.java

package com.sample.spring.bean;

public class Address {
private String line1;
private String line2;
public String getLine1() {
return line1;
}
public void setLine1(String line1) {
this.line1 = line1;
}
public String getLine2() {
return line2;
}
public void setLine2(String line2) {
this.line2 = line2;
}
@Override
public String toString() {
return "Address [line1=" + line1 + ", line2=" + line2 + "]";
}
}

Country.java
package com.sample.spring.bean;

public class Country {
private String cntryName;
private String cntryCode;
public String getCntryName() {
return cntryName;
}
public void setCntryName(String cntryName) {
this.cntryName = cntryName;
}
public String getCntryCode() {
return cntryCode;
}
public void setCntryCode(String cntryCode) {
this.cntryCode = cntryCode;
}
@Override
public String toString() {
return "Country [cntryName=" + cntryName + ", cntryCode=" + cntryCode + "]";
}
}

Division.java
package com.sample.spring.bean;

public class Division {
private String division;
private String divisionId;
public String getDivision() {
return division;
}
public void setDivision(String division) {
this.division = division;
}
public String getDivisionId() {
return divisionId;
}
public void setDivisionId(String divisionId) {
this.divisionId = divisionId;
}
@Override
public String toString() {
return "Division [division=" + division + ", divisionId=" + divisionId + "]";
}
}

Name.java
package com.sample.spring.bean;

public class Name {
private String firstName;
private String lastName;
public String getFirstName() {
return firstName;
}
public void setFirstName(String firstName) {
this.firstName = firstName;
}
public String getLastName() {
return lastName;
}
public void setLastName(String lastName) {
this.lastName = lastName;
}
@Override
public String toString() {
return "Name [firstName=" + firstName + ", lastName=" + lastName + "]";
}
}


Student.java

package com.sample.spring.bean;

import org.springframework.beans.factory.annotation.Autowired;

public class Student {

private String stdid;
private int age;
@Autowired
Name stdName;
@Autowired
Country country;
@Autowired
Address address;

Division division;
public Student(String stdid, int age,Division division) {
super();
this.stdid = stdid;
this.age = age;
this.division = division;
}

public String getStdid() {
return stdid;
}


public void setStdid(String stdid) {
this.stdid = stdid;
}


public int getAge() {
return age;
}


public void setAge(int age) {
this.age = age;
}

@Override
public String toString() {
return "Student [ \n"
+ "stdid=" + stdid + ", \n"
+ "age=" + age + ", \n"
+ "stdName=" + stdName + ", \n"
+ "Country=" + country + ", \n"
+ "Division=" + division + ", \n"
+ "address=" + address + "\n]";
}
}

Then lets create our spring configuration file with following content. We have to put this configuration file on resources folder in our project.

spring-config.xml
<?xml version="1.0" encoding="UTF-8"?>
<beans xmlns="http://www.springframework.org/schema/beans"
    xmlns:xsi="http://www.w3.org/2001/XMLSchema-instance"
    xmlns:context="http://www.springframework.org/schema/context"
    xsi:schemaLocation="http://www.springframework.org/schema/beans
        http://www.springframework.org/schema/beans/spring-beans.xsd
        http://www.springframework.org/schema/context
        http://www.springframework.org/schema/context/spring-context.xsd" default-autowire="byType">

    <context:annotation-config/>
    <bean name="name" class="com.sample.spring.bean.Name" autowire="byName">
    <property name="firstName" value="Rukshan"/>
    <property name="lastName" value="Kumara"/>
    </bean>   
    <bean name="stdName" class="com.sample.spring.bean.Name" autowire="byName">
    <property name="firstName" value="Nirmal"/>
    <property name="lastName" value="Balasooriya"/>
    </bean>   
    <bean name="address1" class="com.sample.spring.bean.Address" autowire="byType">
    <property name="line1" value="adress 1 line 1"/>
    <property name="line2" value="adress 1 line 2"/>
    </bean>
    <bean name="mycountry" class="com.sample.spring.bean.Country">
    <property name="cntryName" value="Sri Lanka"/>
    <property name="cntryCode" value="LK"/>
    </bean>   
    <bean name="divi" class="com.sample.spring.bean.Division">
    <property name="division" value="Excellent"/>
    <property name="divisionId" value="EX"/>
    </bean>   

   <bean name="student" class="com.sample.spring.bean.Student" autowire="constructor">
<constructor-arg name="stdid" value="std0001"/>
<constructor-arg name="age" value="12"/>
<constructor-arg name="division" ref="divi"/>
   </bean>
</beans>

Then lets create our spring loder and load the student bean from there.

MainClass.java
package com.sample.spring;

import org.springframework.context.support.AbstractApplicationContext;
import org.springframework.context.support.ClassPathXmlApplicationContext;

import com.sample.spring.bean.Student;

public class MainClass {
public static void main(String[] args) {
AbstractApplicationContext  context = new ClassPathXmlApplicationContext("spring-config.xml");
Student student=(Student)context.getBean("student");
System.out.println(student);
                context.close();
    }
}


Then if we have to do maven install and run this MainClass.java class then we should get following out put.


Student [ 
stdid=std0001, 
age=12, 
stdName=Name [firstName=Nirmal, lastName=Balasooriya], 
Country=Country [cntryName=Sri Lanka, cntryCode=LK], 
Division=Division [division=Excellent, divisionId=EX], 
address=Address [line1=adress 1 line 1, line2=adress 1 line 2]
]


This sample contains all of above mentioned Autowire mechanisms. Lets see each in more detail manner.

Constructor Autowire 

In the student bean creation Spring container will invoke following bean definition in spring configuration file.


   <bean name="student" class="com.sample.spring.bean.Student" autowire="constructor">
<constructor-arg name="stdid" value="std0001"/>
<constructor-arg name="age" value="12"/>
<constructor-arg name="division" ref="divi"/>
   </bean>

As we can see our student have the stdId as "srd0001" , age as "12" and also Division as "Excellent". Here division loading has been done on different manner it will described on next step. 

Student [ 
stdid=std0001, 
age=12, 
stdName=Name [firstName=Nirmal, lastName=Balasooriya], 
Country=Country [cntryName=Sri Lanka, cntryCode=LK], 
Division=Division [division=Excellent, divisionId=EX], 
address=Address [line1=adress 1 line 1, line2=adress 1 line 2]
]


No (by reference) Autowire 


In the Division object instantiation you can see we did not used the @Autowire annotation in the student class but on the Student bean definition we have pass the constructor argument with ref.

    <bean name="divi" class="com.sample.spring.bean.Division">
     <property name="division" value="Excellent"/>
     <property name="divisionId" value="EX"/>
    </bean>

   <bean name="student" class="com.sample.spring.bean.Student" autowire="constructor">
<constructor-arg name="stdid" value="std0001"/>
<constructor-arg name="age" value="12"/>
<constructor-arg name="division" ref="divi"/>
   </bean>
Thats how Spring used this no autowire to instantiate the division object in to student table.

ByName Autowire 

To demonstrate byName autowire I have added following two bean configurations in to our configuration file.

    <bean name="name" class="com.sample.spring.bean.Name" autowire="byName">
     <property name="firstName" value="Rukshan"/>
     <property name="lastName" value="Kumara"/>
    </bean>   
    <bean name="stdName" class="com.sample.spring.bean.Name" autowire="byName">
     <property name="firstName" value="Nirmal"/>
     <property name="lastName" value="Balasooriya"/>
    </bean>   

If you can see the Student class we gave the Name variable name as stdName so when Spring container do the dependency injection it will look in to bean with that spesific bean name. So because of that we have the firstName as "Nirmal" and lastName as "Balasooriya".

Student [ 
stdid=std0001, 
age=12, 
stdName=Name [firstName=Nirmal, lastName=Balasooriya], 
Country=Country [cntryName=Sri Lanka, cntryCode=LK], 
Division=Division [division=Excellent, divisionId=EX], 
address=Address [line1=adress 1 line 1, line2=adress 1 line 2]
]

ByType Autowire 

To demonstrate byType autowire I have added following two bean configurations in to our configuration file.

    <bean name="address1" class="com.sample.spring.bean.Address" autowire="byType">
    <property name="line1" value="adress 1 line 1"/>
    <property name="line2" value="adress 1 line 2"/>
    </bean>

Based on the autowire="byType" of Address configuration in configuration file spring container injected address with line1 "adress 1 line 1" and line2 "adress 1 line 2".
 
Student [ 
stdid=std0001, 
age=12, 
stdName=Name [firstName=Nirmal, lastName=Balasooriya], 
Country=Country [cntryName=Sri Lanka, cntryCode=LK], 
Division=Division [division=Excellent, divisionId=EX], 
address=Address [line1=adress 1 line 1, line2=adress 1 line 2]
]

default-autowire  

If you carefully see the spring configuration I have added default-autowire in beans tag. Then added Country bean without autowire attribute in the bean definition but in our out put Spring container injected the Country using this default-autowire configuration.

<beans xmlns="http://www.springframework.org/schema/beans"
    xmlns:xsi="http://www.w3.org/2001/XMLSchema-instance"
    xmlns:context="http://www.springframework.org/schema/context"
    xsi:schemaLocation="http://www.springframework.org/schema/beans
        http://www.springframework.org/schema/beans/spring-beans.xsd
        http://www.springframework.org/schema/context
        http://www.springframework.org/schema/context/spring-context.xsd" default-autowire="byType">

    <bean name="mycountry" class="com.sample.spring.bean.Country">
    <property name="cntryName" value="Sri Lanka"/>
    <property name="cntryCode" value="LK"/>
    </bean>   

In the out put default-autowire used to provide Country values cntryName as "Sri Lanka" and  cntryCode as "LK".

Student [ 
stdid=std0001, 
age=12, 
stdName=Name [firstName=Nirmal, lastName=Balasooriya], 
Country=Country [cntryName=Sri Lanka, cntryCode=LK], 
Division=Division [division=Excellent, divisionId=EX], 
address=Address [line1=adress 1 line 1, line2=adress 1 line 2]
]


Monday, November 5, 2018

Spring Boot simple web application with MySQL, JPA, Hibernate on Tomcat

In this post I'm going to setup Spring Boot web project and do small code demonstration for understanding the structure of the project as well as deploying in to Tomcat as war.

Prerequisites 
  1. You should have install java 1.8 or above.
  2. You should have Eclipse installed in your PC.
  3. Your PC should setup Maven installed and configured.

Lets create the maven project on Eclipse go to File -> New -> Maven Project then tick on Creat a simple project and click next. (As show in bellow figure)


Then provide Group Id and Artifact Id and change the packaging as war as show in bellow figure. Then click on finish.


Then change the project JRE to JDK on Java Build Path on the project.

The main advantage on SpringBoot is its reduces lots of development time and increases productivity. In order to use SpringBoot with Hibernate we have to add required dependencies as show in bellow on pom.xml.

<project xmlns="http://maven.apache.org/POM/4.0.0" xmlns:xsi="http://www.w3.org/2001/XMLSchema-instance" xsi:schemaLocation="http://maven.apache.org/POM/4.0.0 http://maven.apache.org/xsd/maven-4.0.0.xsd">
  <modelVersion>4.0.0</modelVersion>
  <groupId>com.springboot.sample</groupId>
  <artifactId>SpringBootWeb</artifactId>
  <version>0.0.1-SNAPSHOT</version>
  <packaging>war</packaging>

    <parent>
        <groupId>org.springframework.boot</groupId>
        <artifactId>spring-boot-starter-parent</artifactId>
        <version>2.0.5.RELEASE</version>
    </parent>
<dependencies>
<!-- Compile -->
<dependency>
<groupId>org.springframework.boot</groupId>
<artifactId>spring-boot-starter-web</artifactId>
</dependency>
        <dependency>
            <groupId>org.springframework.boot</groupId>
            <artifactId>spring-boot-starter-data-jpa</artifactId>
        </dependency>
<dependency>
<groupId>javax.servlet</groupId>
<artifactId>jstl</artifactId>
</dependency>
<!-- Provided -->
<dependency>
<groupId>org.apache.tomcat.embed</groupId>
<artifactId>tomcat-embed-jasper</artifactId>
<scope>provided</scope>
</dependency>
<!-- Runtime -->
<dependency>
<groupId>mysql</groupId>
<artifactId>mysql-connector-java</artifactId>
<version>5.1.6</version>
</dependency>
</dependencies>
<build>
<plugins>
<plugin>
<groupId>org.springframework.boot</groupId>
<artifactId>spring-boot-maven-plugin</artifactId>
</plugin>
                       <finalName>SpringBootWeb</finalName>
</plugins>
</build>
  
</project>

Spring Boot allows developers to configure their application using a configuration file named application.properties. This configuration file should put in the src/main/resource folder. For our application we use following configurations on application.properties file.

spring.mvc.view.prefix: /WEB-INF/jsp/
spring.mvc.view.suffix: .jsp
application.message: Hello world

#==== connect to mysql ======#
spring.jpa.hibernate.ddl-auto=update
spring.datasource.url=jdbc:mysql://localhost:3306/sample?useSSL=false
spring.datasource.username=root
spring.datasource.password=
spring.datasource.driver-class-name=com.mysql.jdbc.Driver
spring.jpa.properties.hibernate.dialect = org.hibernate.dialect.MySQL5Dialect

Configuration file content

Then lets create simple table on MySQL using following SQL.
--
-- Table structure for table `country`
--

DROP TABLE IF EXISTS `country`;
CREATE TABLE `country` (
 `id` int(11) NOT NULL AUTO_INCREMENT,
 `name` varchar(250) NOT NULL,
 `code` varchar(10) NOT NULL,
 PRIMARY KEY (`id`)
)

Then add following countries in to table.

--
-- Dumping data for table `country`
--

INSERT INTO `country` (`id`, `name`, `code`) VALUES
(1, 'Sri Lanka', 'SL'),
(2, 'Singapore', 'SG'),
(3, 'India', 'IN');
COMMIT;

Then lets try to load these countries on JSP page using Hibernate with SpringBoot.

First of all lets create model class for country as bellow.

package com.sample.springboot.dao.model;

import javax.persistence.Entity;
import javax.persistence.*;

@Entity
@Table(name = "country")
public class Country {
@Id
@GeneratedValue(strategy = GenerationType.AUTO)
@Column(name="id")
private long id;
private String name;
private String code;
public long getId() {
return id;
}
public void setId(long id) {
this.id = id;
}
public String getName() {
return name;
}
public void setName(String name) {
this.name = name;
}
public String getCode() {
return code;
}
public void setCode(String code) {
this.code = code;
}
}

Then lets create CountryDao interface for country model by using CrudRepository.

package com.sample.springboot.dao;

import org.springframework.data.repository.CrudRepository;
import org.springframework.stereotype.Repository;
import com.sample.springboot.dao.model.Country;


@Repository
public interface CountryDao  extends CrudRepository<Country,Long> {

}


Then lets create Controller class to do the URL mapping for "/" which mean when loading our application this controller will tel what application container should do. Lets implement our controller as bellow.

package com.sample.springboot.controller;

import java.util.Map;

import javax.sql.DataSource;

import org.springframework.beans.factory.annotation.Autowired;
import org.springframework.beans.factory.annotation.Value;
import org.springframework.stereotype.Controller;
import org.springframework.web.bind.annotation.GetMapping;

import com.sample.springboot.dao.CountryDao;
import com.sample.springboot.dao.model.Country;

@Controller
public class MyController {

@Autowired
DataSource dataSource;

@Autowired
CountryDao systemRepository;
@Value("${application.message:Hello World}")
private String message;

@GetMapping("/")
public String welcome(Map<String, Object> model) {
String countries="";
Iterable<Country> systemlist = systemRepository.findAll();
System.out.println("here are system count: " + systemlist.toString());
for(Country country:systemlist){
countries+=country.getName()+" ";
System.out.println("Here is a system: " + country.toString());
}
model.put("message", this.message);
model.put("countries", countries);
return "Hello";
}

}

Then lets add our Hello JSP page in to the application. Accoutering to our configuration file it should be place in webapp/WEB-INF/jsp. Lets add following content in to that. It will simply print two messages "message" and "countries".

<!DOCTYPE html>
<body>
Welcome to Spring Boot JSP page
<br>
Message: ${message}
<br>
<br>
List of countries from DB: ${countries}
</body>
</html>


After that lets create our entry point for the web application. Lets Name it as MyApp.java with following contents.

package com.sample.springboot;

import javax.sql.DataSource;

import org.springframework.beans.factory.annotation.Autowired;
import org.springframework.boot.SpringApplication;
import org.springframework.boot.autoconfigure.SpringBootApplication;
import org.springframework.boot.builder.SpringApplicationBuilder;
import org.springframework.boot.web.servlet.support.SpringBootServletInitializer;
import org.springframework.data.jpa.repository.config.EnableJpaRepositories;

@SpringBootApplication
@EnableJpaRepositories("com.sample.springboot")
public class MyApp extends SpringBootServletInitializer{

@Autowired
DataSource dataSource;
@Override
protected SpringApplicationBuilder configure(SpringApplicationBuilder application) {
return application.sources(MyApp.class);
}

public static void main(String[] args) {
SpringApplication.run(MyApp.class, args);
}
}

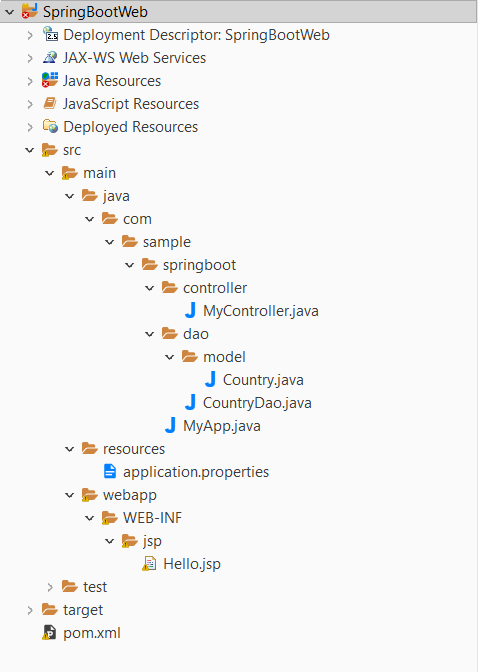
So our final project structure will be similar to bellow figure.


Now our application ready to run. Lets create war file by maven install command. Right click on project and go to Run As -> Maven Install.


Then after successful installation you can see SpringBootWeb.war file inside the target folder. Now lets deploy this war file in to Tomcat server. (Place this war file inside the webapps folder on tocat and then start the tomcat server)


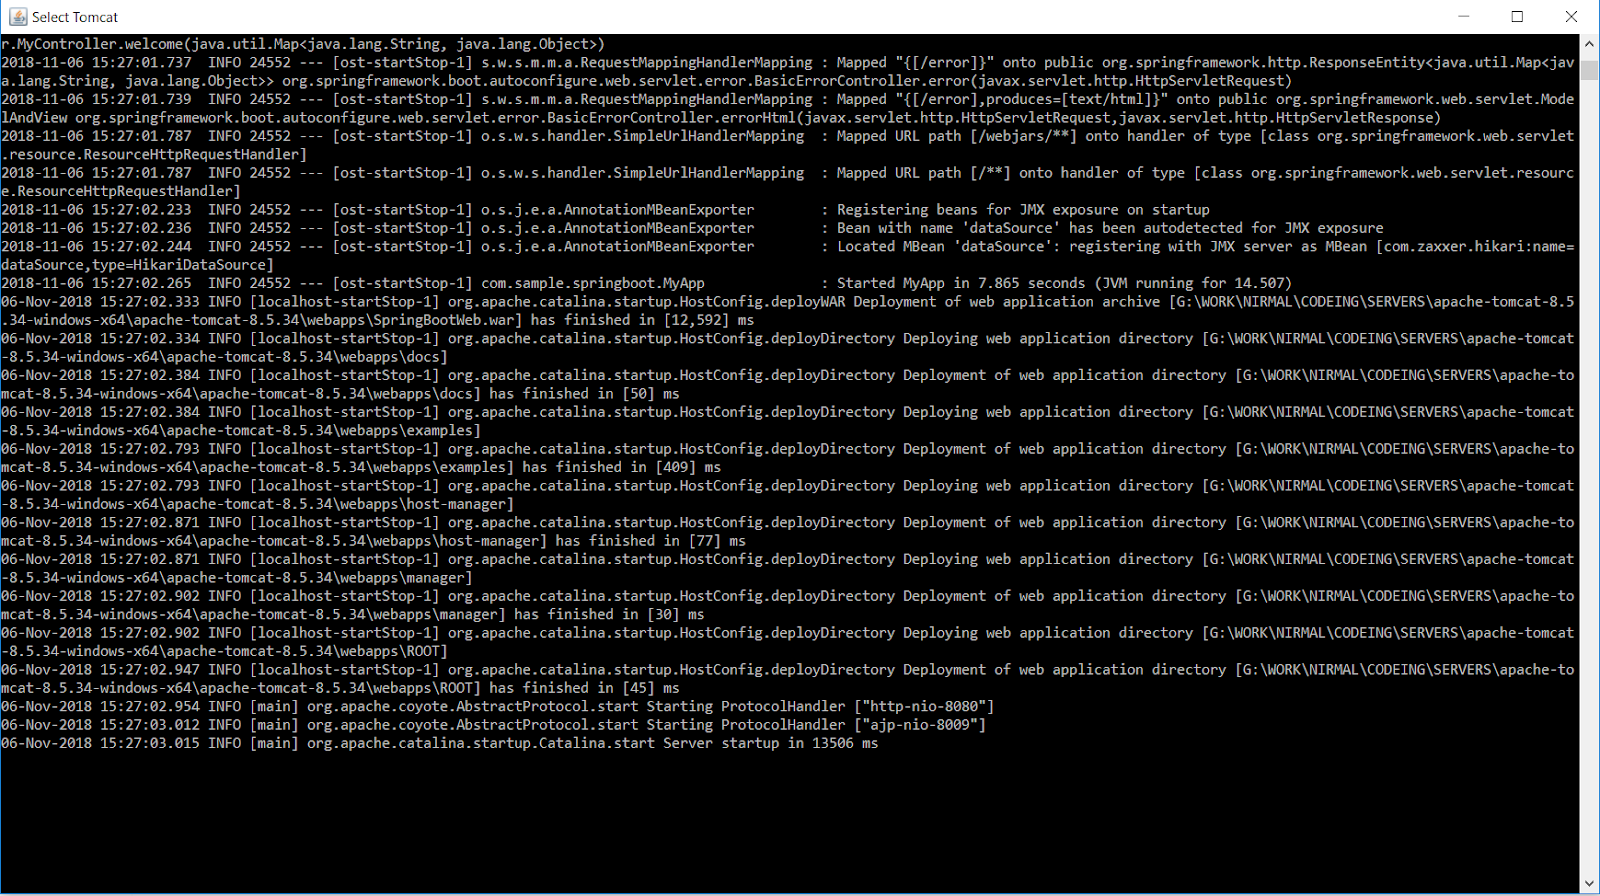
When successfully deployed the application you will be able to see similar out put on tomcat console.


Then you can access newly created web application on following URL 
http://localhost:8080/SpringBootWeb/ and you should be able to see similar page as bellow figure.


You can access sample project in following GITHUB location.

Sunday, August 12, 2018

Angular 6 hello world example


In this post I'm going to setup angular 6 project and do small code demonstration for understanding the structure of the project.

Prerequisites 
  1. You should have install java 1.8 or above.
  2. You should have Eclipse installed in your PC.
  3. Your PC should setup Maven installed and configured.
 First of all lets install Angular and node in local machine. First we need to install node in local machine. You can download nodejs from following location. In my application I'm using node version node-v8.11.3-x64. Install it in your local machine. Then we can install Angular in local machine. Open command prompt and type following command and press enter it will install Angular in your local machine globally.

npm install -g @angular/cli

It will take around 1 minute to install Angular and now our machine ready to start the Angular developments.

Lets create Maven project to create our Hello World Angular application. Go to File -> New -> Maven Project and check on create simple project tick box as show below.


Then click next and provide Group ID ,Artifact ID and change the packaging to war as show in bellow screen shot. Then Click Finish.


Then go to main folder under src and right click on it then got to Show In -> Console then type following command to generate angular project under main folder.

ng new AngularHelloWorld

Then click enter and that command will create AngularHelloWorld project for you. Then you can refresh the project and see new folder has been created under main folder similar to bellow screen shoot.


Then go to AnngularHellowWorld - >src -> App and open the app.component.html folder and past following content inside it.

<!--The content below is only a placeholder and can be replaced.-->
<div style="text-align:center">
  <h1>
    Welcome to Angular Hello World App!
  </h1>
</div>

Then again open Command Prompt and go to AngularHelloWorld folder and build the Angular Application by entering following commands.

ng build

Then you should able to see similar out put to bellow screen shot.


Then lets verify our application build successfully by refreshing project folder and you will be able to Angular generated output on dist folder under  AngularHelloWorld.


Then copy the content on AngularHelloWorld under dist folder and place it on the WebContent folder as show in bellow.


For this manual content copy we have to change one modification on index.html you have to change the following change.

<base href="/">
To
<base href="/AngularHelloWorld/">


Then lets and web.xml in to our project. Write click on webapp folder and new -> Folder and give folder name as WEB-INF. Then create web.xml file inside on it with following content.

<!DOCTYPE web-app PUBLIC
 "-//Sun Microsystems, Inc.//DTD Web Application 2.3//EN"
 "http://java.sun.com/dtd/web-app_2_3.dtd" >

<web-app>
  <display-name>Angular Web Application</display-name>
</web-app>

Final project structure would be similar to following figure.


Now write click on our AngularHelloWorld  project and go to run As -> Maven Install then you can see the generated war file on target folder. Now you can run your angular web application on tomcat server by deploying it on internal or external tomcat server.

Then you will be able to access your Angular web application on following URL http://localhost:8080/AngularHelloWorld/.

You will be able to see similar output as below figure.


You can access sample project in following GITHUB location.

Wednesday, October 11, 2017

JCache simple cache manage example

In this post I'm going to demonstrate how to use JCache which provide memory caching functionality based on the JCache JSR (JSR-107).
JCache is a standard caching API for Java. It provides an API for applications to be able to create and work with in-memory cache of user defined objects. There are many advantages in JCache such as – developers does not need to concentrate on the finer details of implementing the Caching and  that time can spent on the development of the core business logic in the application.


So in this post I'll describe very simple instructions to initialize JCache and how to load data in to memory, retrieve data from memory and remove data from memory cache. Note that this is very simple introduction to JCache cache management and I will provide move advanced features in future posts.

Prerequisites 
  1. You should have install java 1.6 or above.
  2. You should have Eclipse installed in your PC.
  3. Your PC should setup Maven installed and configured.

First lets create maven project in Eclipse. Go to File -> New -> Maven Project then tick the check fox for the Create Simple Project (Skip archetype selection)  and then click next. On next screen just provide some name for Group ID and Artifact ID (as show on below figure) then click finished.


Figure 1 : Providing Artifact Id as HazelcastForBeginer
Then set project run time environment as JDK according to your local JAVA installation. You can change the runtime environment Right click project the go to Build Path -> Configure Build path .. then on Libraries tab click on JRE System Library and remove existing one. Then add new JDK reference. So final configuration will be similar to Figure 

Figure 2 : Changing the JRE in project
Figure 3 : Set JDK in run time environment for project


After that make sure you change Java Compiler in to 1.8 you can change it on Java Compiler in project properties. As show on below figure.

Figure 4: Change Compiler to 1.7 or above

Then needed to add required relevant dependencies. For this example we required only following two dependencies.
  
  <dependencies>
    <dependency>
<groupId>javax.cache</groupId>
<artifactId>cache-api</artifactId>
<version>1.0.0</version>
</dependency>
<dependency>
    <groupId>com.hazelcast</groupId>
    <artifactId>hazelcast</artifactId>
    <version>3.9-EA</version>
</dependency>
  </dependencies>

Then add new class call "HazelcastMain" in to the project and provide any name for that class then just add following code portion.


package com.test.hazelcast;

import javax.cache.Cache;
import javax.cache.CacheManager;
import javax.cache.Caching;
import javax.cache.configuration.MutableConfiguration;
import javax.cache.spi.CachingProvider;

public class HazelcastMain {
public static void main(String[] args) {
HazelcastMain mainApp=new HazelcastMain();
String key="val1";
mainApp.addOrUpdateCache(key, "test1");
String value = mainApp.getValue(key);
System.out.println("value from cache : "+ value);
mainApp.addOrUpdateCache(key, "test2");
value = mainApp.getValue(key);
System.out.println("value after update: "+ value);
mainApp.removeFromCache(key);
value = mainApp.getValue(key);
System.out.println("value after remove: "+ value);
}
private String getValue(String key){
Cache<String, String> cache = getChacheManager();
return cache.get(key);
}
private void removeFromCache(String key){
Cache<String, String> cache = getChacheManager();
cache.remove(key);
}
private void addOrUpdateCache(String key, String value){
Cache<String, String> cache = getChacheManager();
cache.put(key, value);
}
private Cache<String, String> getChacheManager(){
CachingProvider cachingProvider = Caching.getCachingProvider();
CacheManager cacheManager = cachingProvider.getCacheManager();
MutableConfiguration<String, String> config
  = new MutableConfiguration<>();
Cache<String, String> cache = cacheManager
  .getCache("simpleCache");
if(cache==null){
cache = cacheManager
  .createCache("simpleCache", config);
}
return cache;
}
}


Then run the application. You should see similar result to below out put.

Figure 5 : Output of the application

You can see it has initially it added "test1" value in to cache then it has updated to "test2" then after we remove it from cache it returned "null" value.

You can access the project code GIT hub repository location.